Posted on

Upgrading the Amiga 3000(T)/4000(T) with a 68060 CPU

BFG9060 - 68060 CPU Accelerator Board for Amiga 3000(T)/4000(T)

Your Amiga 3000 or 4000 has Zorro III slots, room for a graphics card, a network card and fast storage. What usually holds it back is the CPU. With a 68060 and 128 MB of fast memory on one board, the big-box Amiga becomes the machine it was always meant to be. This guide shows what the BFG9060 accelerator changes, which CPU to choose and how to install it, step by step.

What a 68060 Opens Up
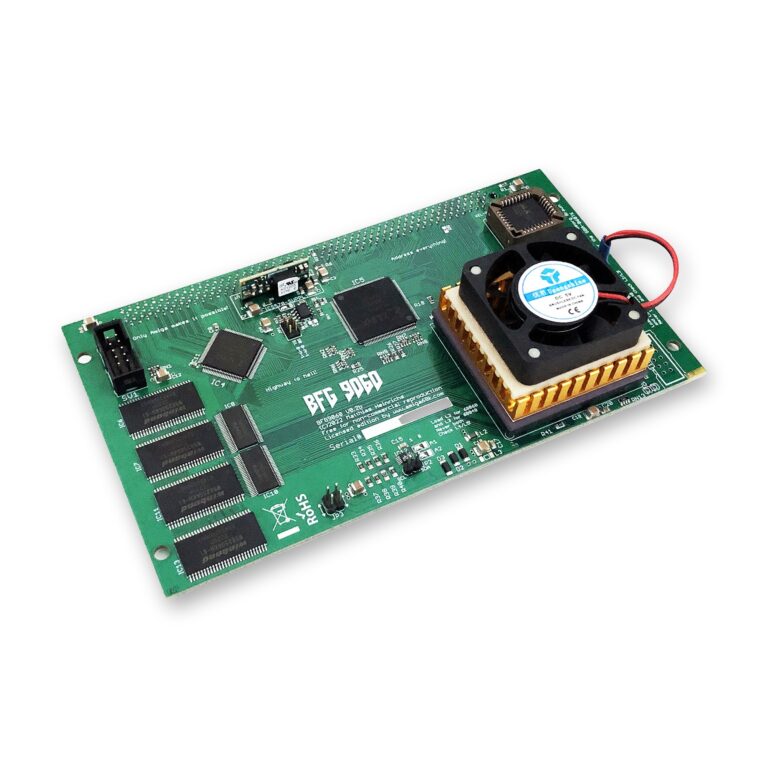
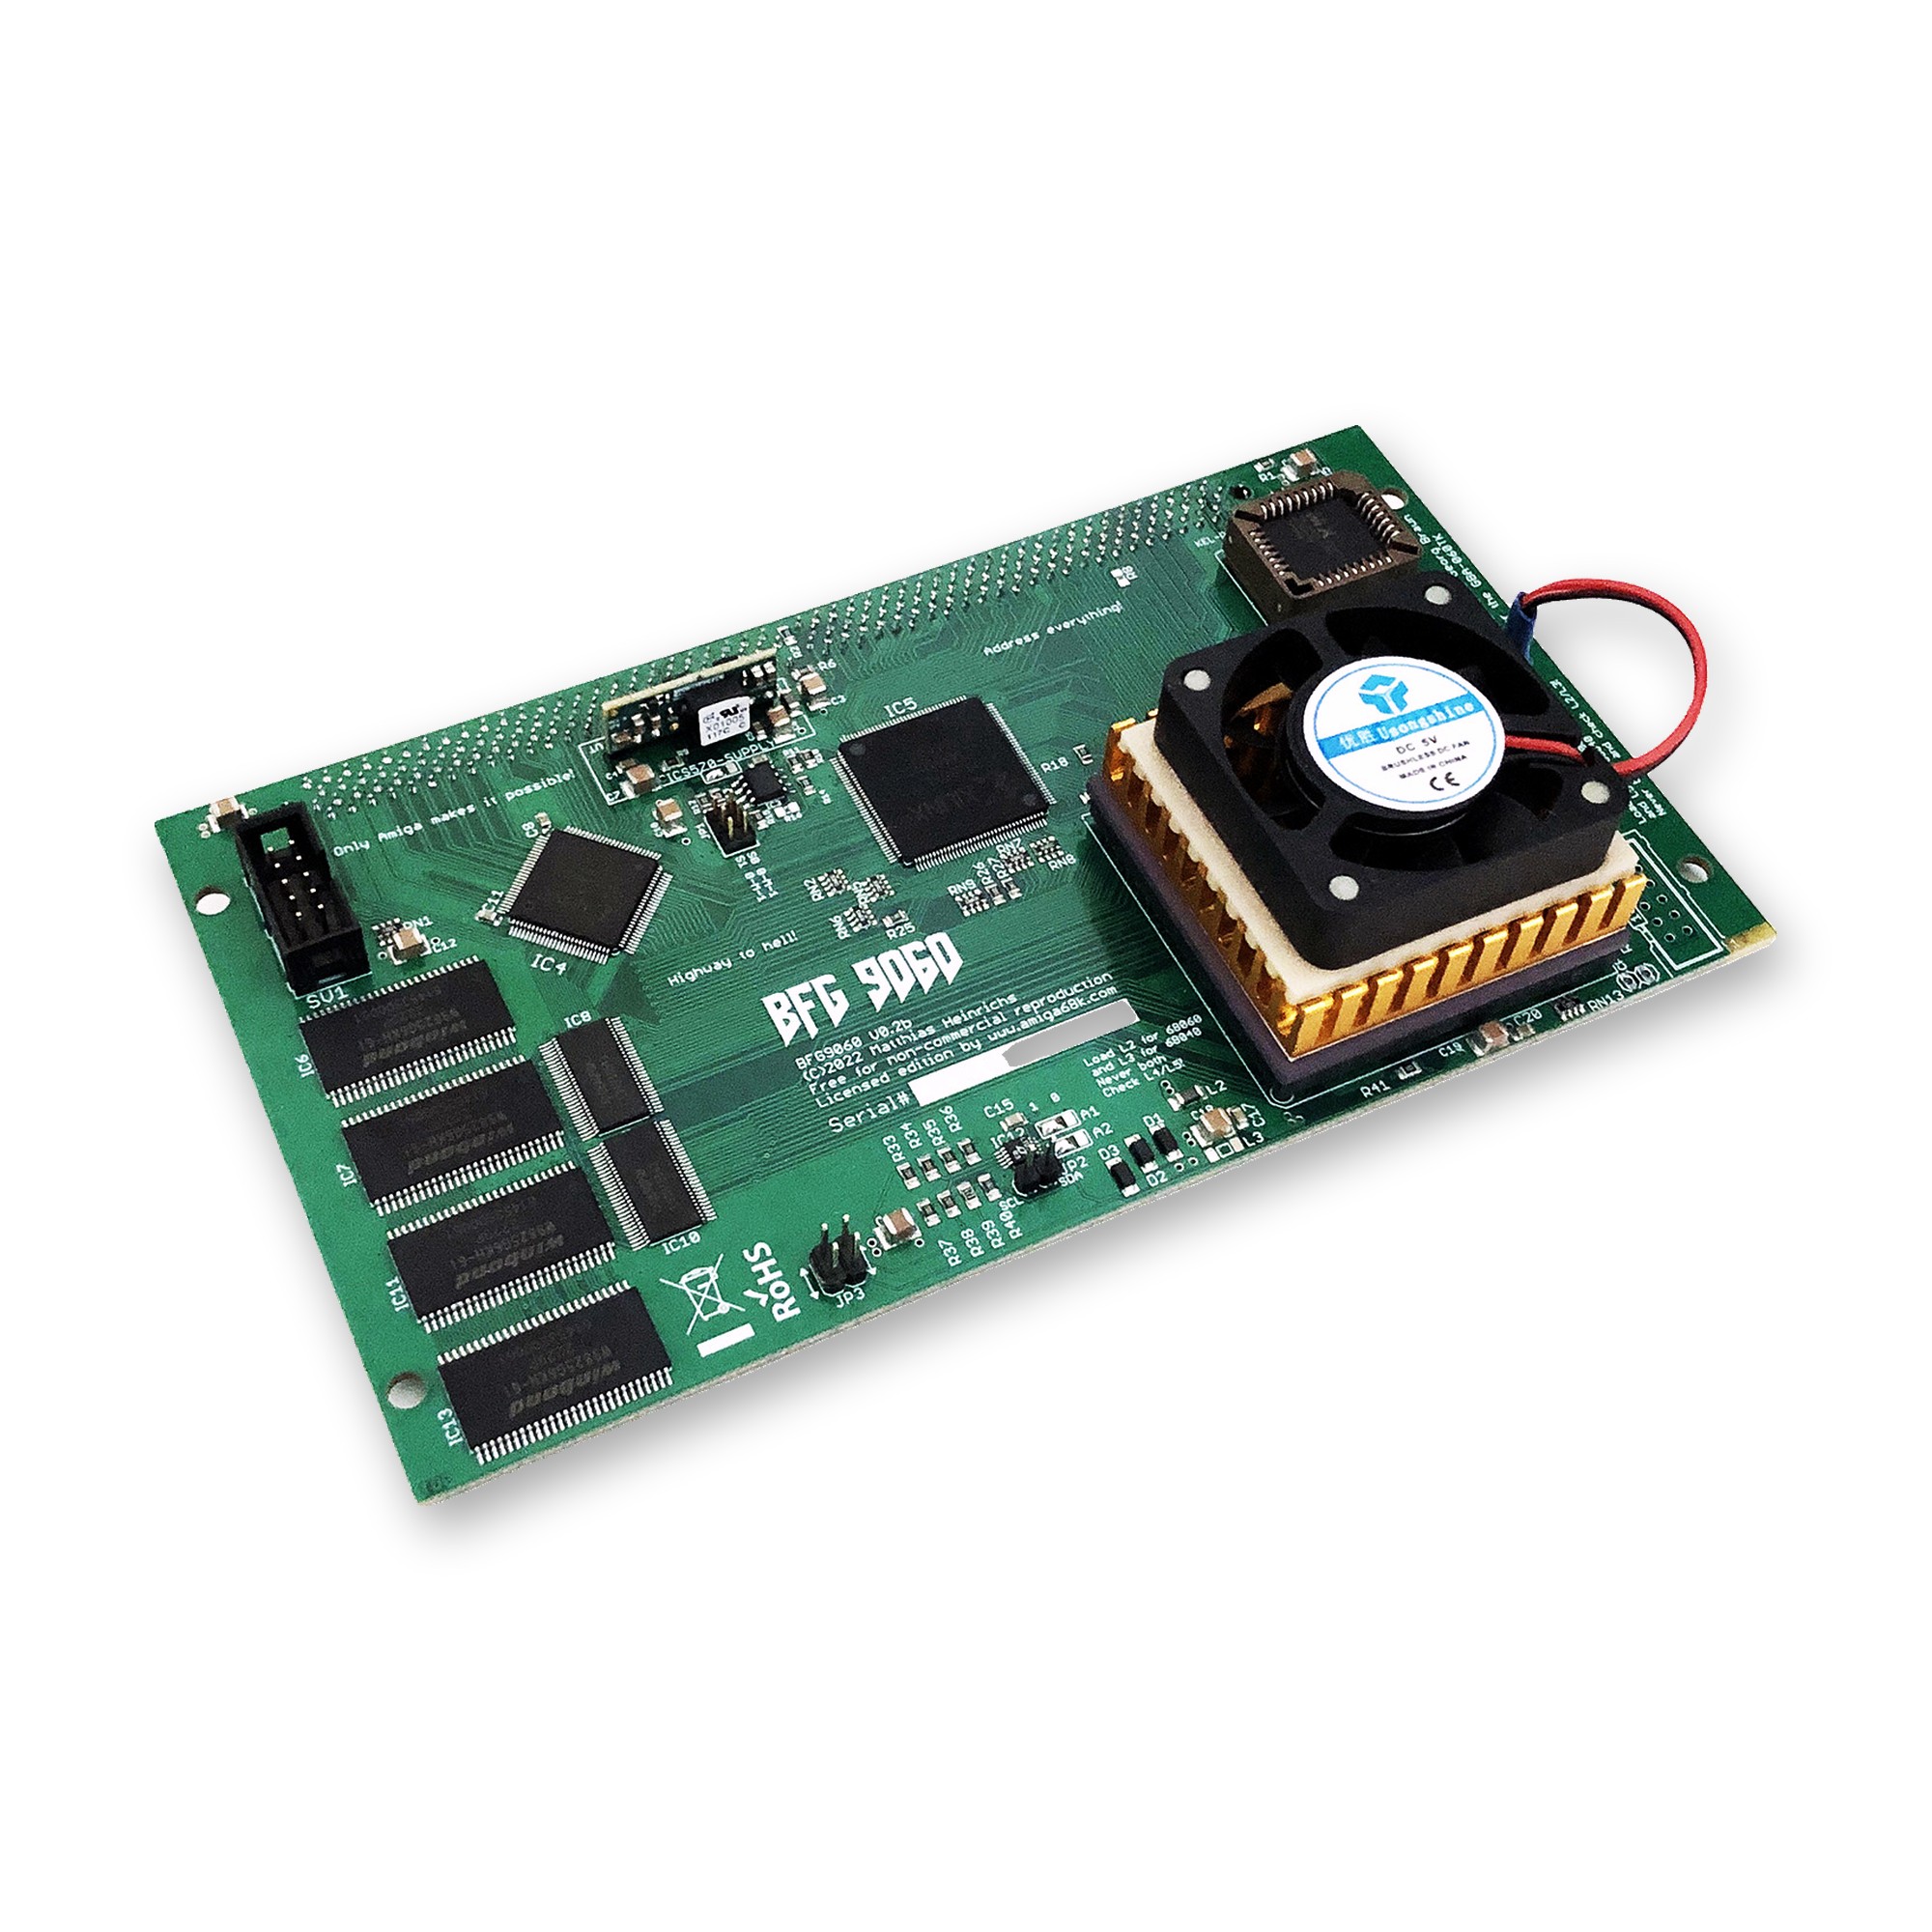
BFG9060 68060 accelerator board with heat sink and fan
The BFG9060 with an MC68060 under the optional heat sink/fan module.

The 68060 is the fastest CPU of Motorola’s 68k family, and the BFG9060 brings it to the A3000(T) and A4000(T) together with 128 MB of Fast RAM. That combination opens up a lot that a stock big-box Amiga struggles with:

  • AmigaOS 3.2 that feels instant: windows, drawers and requesters open without waiting, even with many programs running.
  • Graphics cards come into their own: an RTG Workbench in high resolutions and many colours needs CPU power, and the 060 delivers it.
  • Software written for the 060: ports of Doom and Quake, MP3 playback, image processing and 3D rendering with the built-in FPU of the full MC68060.
  • Networking at full speed: the TCP/IP stack is CPU-bound, and an A4000 with a 68060 easily reaches over 600 kB/s on a Multiface network card.
  • Room for everything: 128 MB of Fast RAM for large programs, RAM disks and WHDLoad, which installs games to the hard drive.

How Fast Is It?
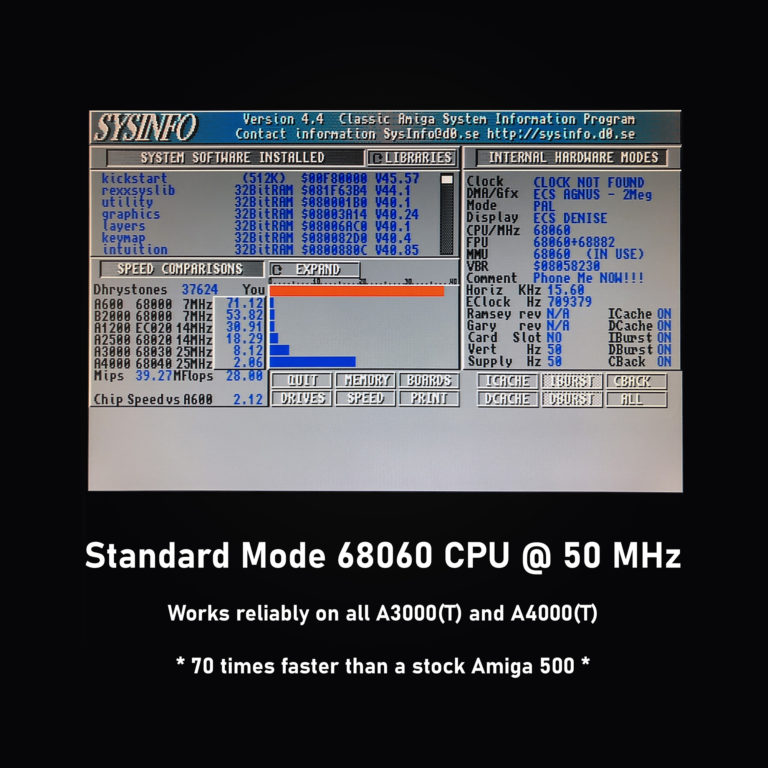
SysInfo screenshot of an Amiga 4000 with BFG9060, 68060 at 50 MHz
Standard mode, 68060 at 50 MHz: works reliably in all A3000(T) and A4000(T).
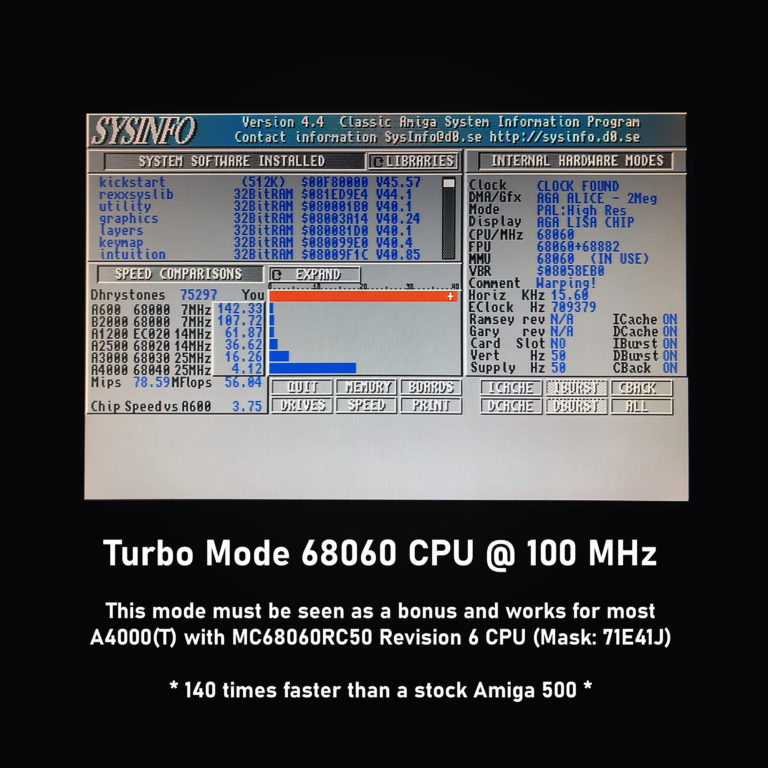
SysInfo screenshot of an Amiga 4000 with BFG9060, 68060 at 100 MHz
Turbo mode, 68060 at 100 MHz, for most A4000(T) with an MC68060RC50 revision 6.

These values come from SysInfo on my test machine, an Amiga 4000 with a BFG9060 and an MC68060RC50 revision 6:

SysInfo BFG9060 at 50 MHz
Dhrystones 37,624
MIPS 39.27
MFlops 28.00
Compared with an A3000 (68030, 25 MHz) 8.12 times faster
Compared with an A4000 (68040, 25 MHz) 2.06 times faster
Compared with an A600 (68000, 7 MHz) 71.12 times faster

In an A4000 or A4000T, a revision 6 MC68060RC50 can run in turbo mode at 75 MHz or even 100 MHz in most cases. At 100 MHz SysInfo shows around 140 times the speed of a stock Amiga 500. Turbo mode is a bonus, not a promise: see the section on overclocking below.

The BFG9060 at a Glance

The BFG9060 is designed by Matthias Heinrichs. I build it brand new under his official licence and pay a royalty for every board. It offers:

  • a choice of CPU: MC68060RC50 revision 6 (FPU and MMU), MC68LC060RC50 revision 4 (MMU only) or MC68040RC25 (FPU and MMU)
  • 128 MB of very fast on-board Fast RAM that supports DMA and move16 bursts
  • a boot ROM that handles every 68040 and 68060, with or without FPU, without a special Kickstart ROM: plug and play
  • jumper-selected overclocking to 75 MHz or 100 MHz (MC68060RC50 revision 6 only, in the A4000 and A4000T only)
  • options: LTC2990 voltage and temperature monitor, floppy disk with the 68060 library files, low-profile or high-profile heat sink/fan module
  • a two-year warranty in case of defect (no warranty for overclocked CPUs)

Which CPU to Choose

  • MC68060RC50 revision 6 (mask 71E41J): the full 68060 with MMU and FPU, the latest revision Motorola produced and the one for turbo mode. Software installs without a second thought, and programs that need an FPU run. My recommendation for most owners. Also available on its own as the MC68060RC50 CPU, revision 6.
  • MC68LC060RC50 revision 4 (mask 75G59Y): MMU, no FPU, the low-cost way to 060 speed. The vast majority of Amiga software does not need an FPU. When an installer offers no 060 option without FPU, choose the 020/030 version: the program then runs at full 060 speed. On its own: the MC68LC060RC50 CPU.
  • MC68040RC25: FPU and MMU at 25 MHz, for owners who want a 68040 system with 128 MB of Fast RAM.

Before You Start

The BFG9060 needs at least Kickstart 3.1; Kickstart 3.2 or newer is recommended. Some early Amiga 3000 desktops have a dual Kickstart ROM 1.4/2.0, which does not work with the BFG9060, so those machines need proper Kickstart ROMs first.

On the Amiga 3000, the onboard SCSI controller can hang with a 68040 or 68060 board: the SCSI LED stays on while the mouse still moves. The cause is the A3000’s DMAC chip, and the lasting fix is a newer DMAC, which the ReSDMAC project provides. The other way is to run your drives on a separate controller (see below).

Installing the BFG9060 Step by Step

  1. Ground yourself before you touch the board, for example on a radiator. Static discharge can damage the CPU and the board.
  2. Install the CPU libraries first, while the Amiga still runs on its old CPU. Copy the 68040 or 68060 library files to LIBS:. With AmigaOS 3.2 you can use the MMULib libraries from the installation disks; the MMULib package is also free on aminet.net and on the optional floppy disk. Do not use the Phase 5 or Apollo 680×0 libraries: they are written for those cards.
  3. Add the MMU-Configuration file. With MMULib, copy the optimised MMU-Configuration file for the BFG9060 to ENVARC:. It is on the floppy disk, on the last page of the letter that comes with the board and in the BFG9060 thread on a1k.org.
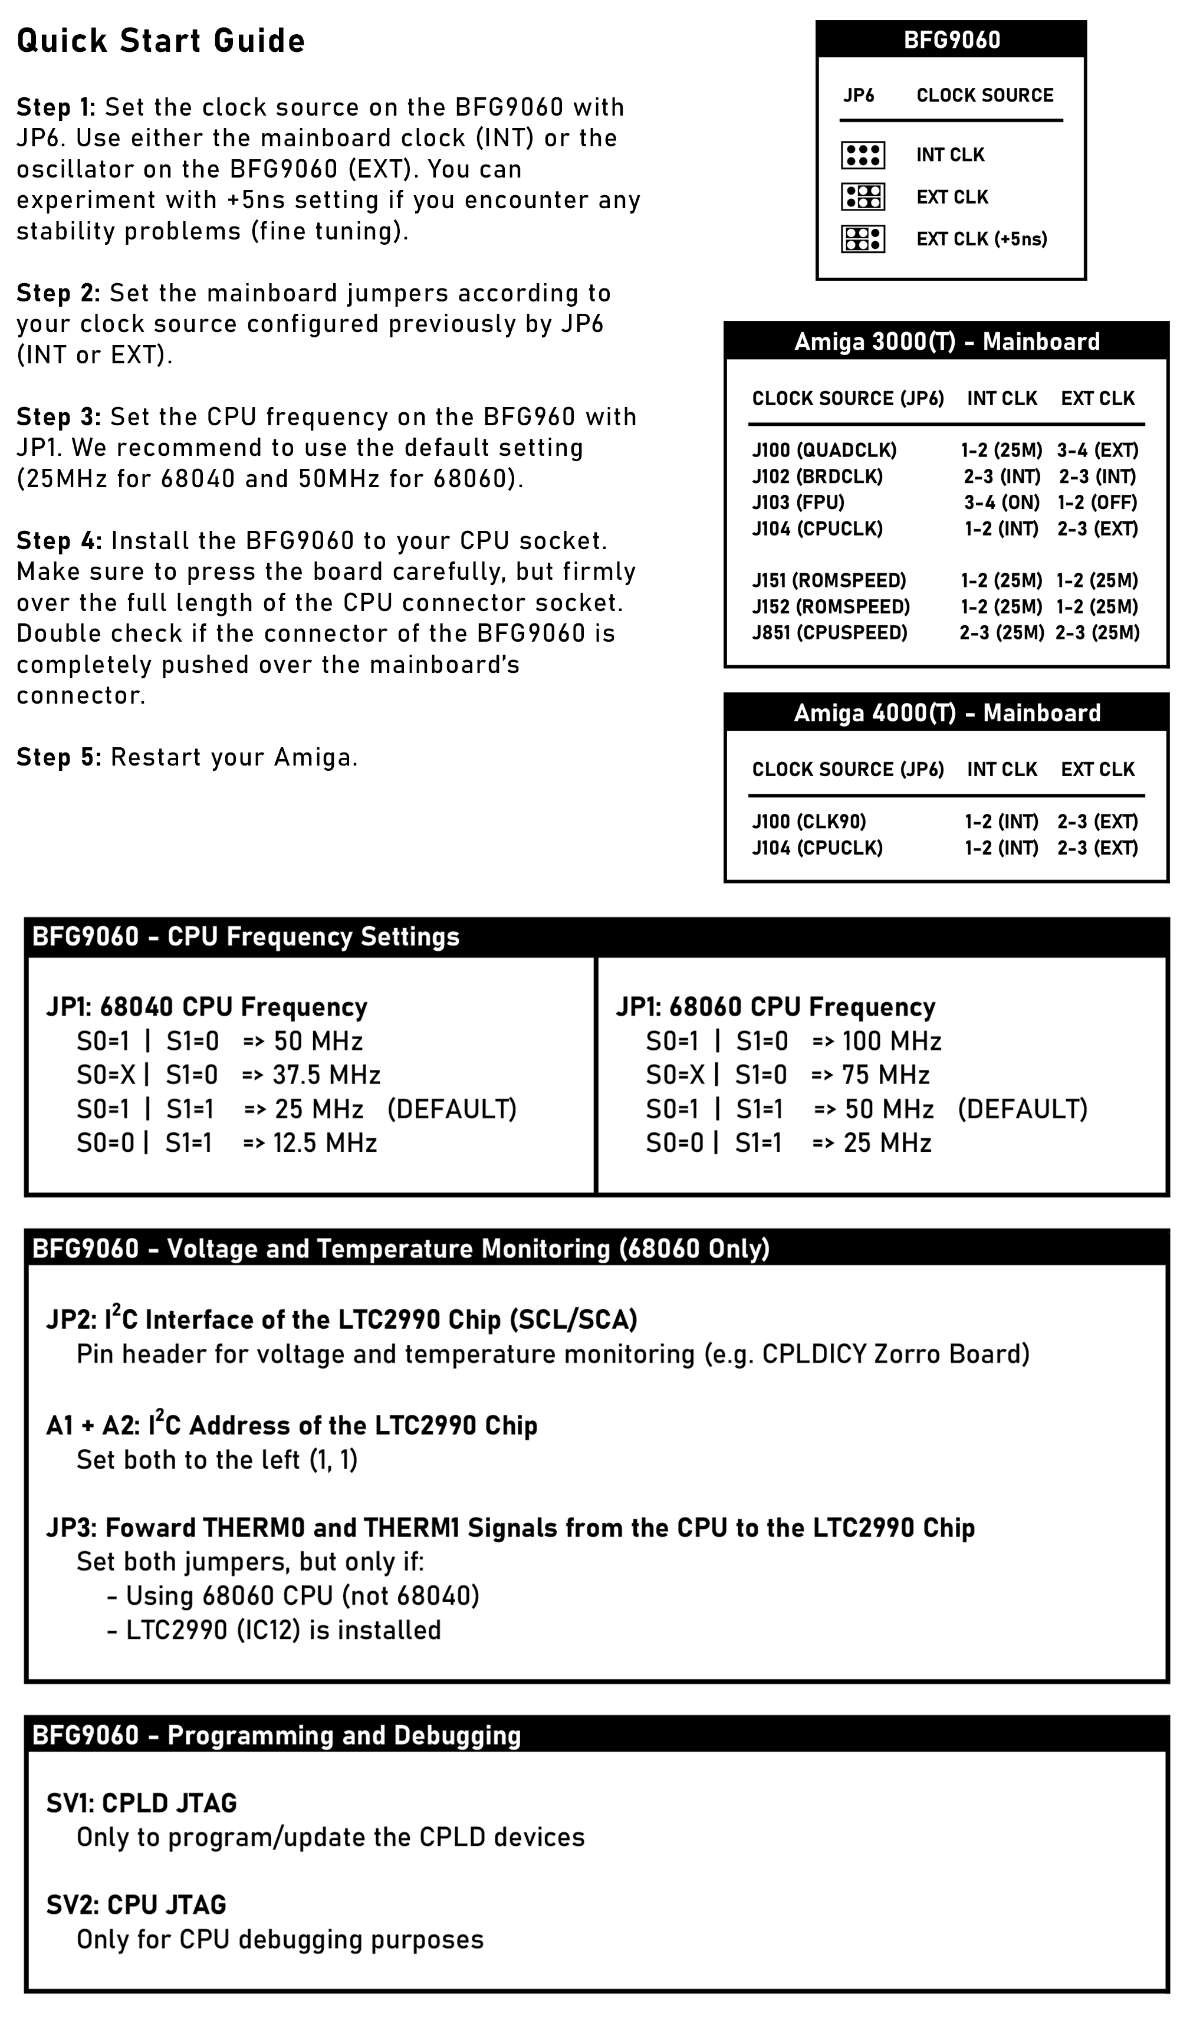
  4. Set the clock source on the BFG9060 with JP6: the mainboard clock (INT) or the oscillator on the BFG9060 (EXT). With EXT you can try the +5 ns setting if you see stability problems.
  5. Set the mainboard jumpers to match JP6 (table below).
  6. Set the CPU frequency with JP1. Start with the default: 50 MHz for a 68060, 25 MHz for a 68040.
  7. Fit the board in the CPU slot after removing the old accelerator, if any. Press it in carefully but firmly over the full length of the connector, and check that it sits completely on the mainboard’s connector.
  8. Start the Amiga. Short colour bars at power-on show that the board’s boot ROM is running.

Mainboard Jumpers

Jumper INT clock EXT clock
Amiga 3000(T)
J100 (QUADCLK) 1-2 (25M) 3-4 (EXT)
J102 (BRDCLK) 2-3 (INT) 2-3 (INT)
J103 (FPU) 3-4 (ON) 1-2 (OFF)
J104 (CPUCLK) 1-2 (INT) 2-3 (EXT)
J151 / J152 (ROMSPEED) 1-2 (25M) 1-2 (25M)
J851 (CPUSPEED) 2-3 (25M) 2-3 (25M)
Amiga 4000(T)
J100 (CLK90) 1-2 (INT) 2-3 (EXT)
J104 (CPUCLK) 1-2 (INT) 2-3 (EXT)
BFG9060 quick start guide with jumper settings
The quick start guide that comes with every BFG9060: clock source, mainboard jumpers, CPU frequency and monitoring.

The full manual, written by Torsten Kurbad, is the BFG9060 README on GitLab.

Cooling, Turbo Mode and Monitoring
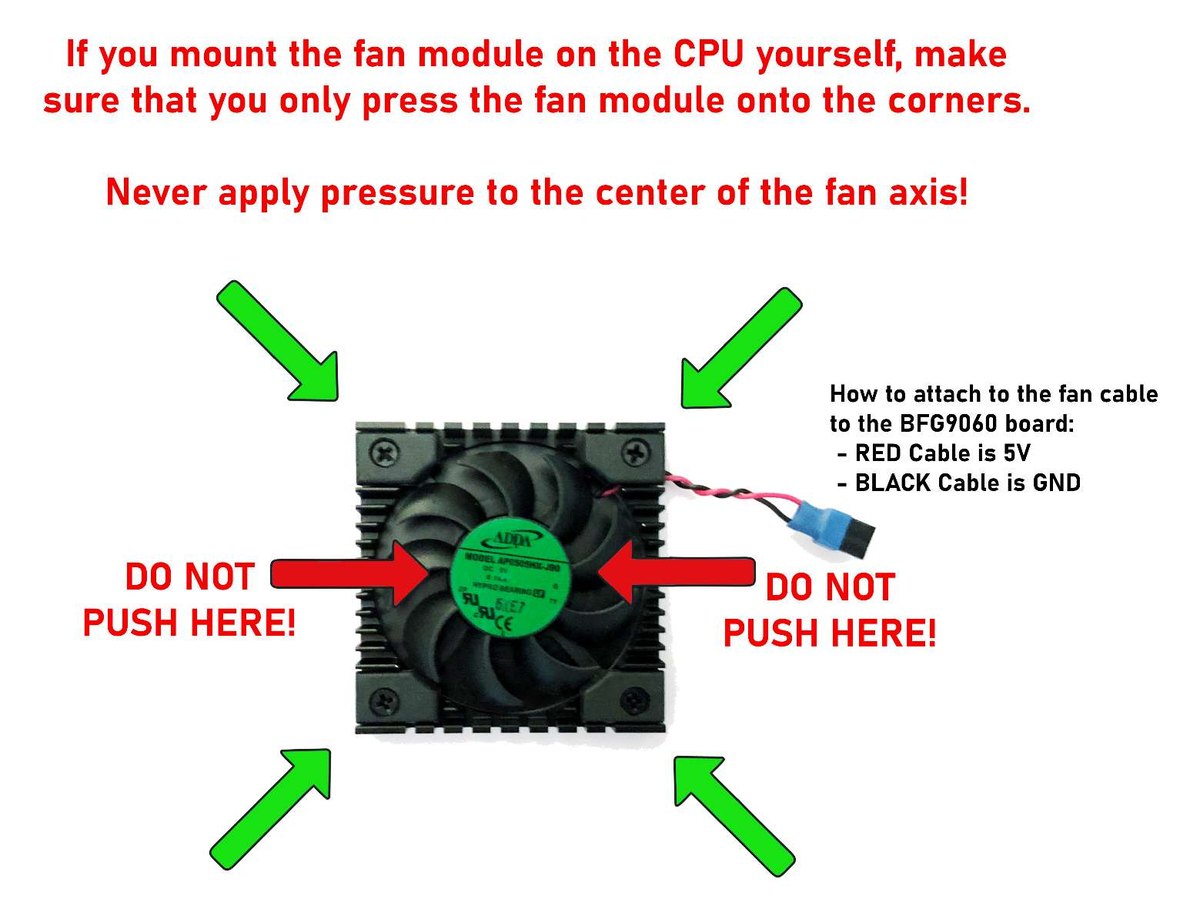
How to press the fan module onto the CPU: only at the corners
Press the fan module on at the corners, never on the fan axis.

At 50 MHz a revision 6 MC68060 is the easy case. The older revisions 1 and 5 run quite a bit hotter, and active cooling is recommended for them. The heat sink/fan modules come in two heights: the high-profile module for the A3000T and A4000(T), the low-profile module for the A3000 desktop. The red wire goes to 5 V, the black wire to ground. If you fit a module yourself, press it onto the CPU at its corners only, never in the middle over the fan axis.

Turbo mode: with JP1, a revision 6 MC68060RC50 can run at 75 MHz or even 100 MHz in most cases, in the A4000 and A4000T only. I cannot guarantee a stable system with an overclocked CPU, overclocked CPUs are not covered by the warranty, and at 100 MHz cooling is a must. The nominal 50 MHz is my recommendation for everyday work; turbo mode is there for those who like to experiment.

With the optional LTC2990 monitor the board measures the CPU temperature and its supply voltages. Connect the JP2 header to an I2C controller such as the CPLDICY Zorro I2C controller and read the values with simplesensors or Sensei. Set both JP3 jumpers only with a 68060 and the LTC2990 fitted.

Complete the System: Storage and Network

A 68060 deserves fast storage and a network connection:

  • Zorro III SCSI with DMA: the ReA4091 reaches 6-8 MB/s in practice, around 3-4 times faster than Zorro II IDE cards. It needs a Super Buster 11 chip. Pair it with a BlueSCSI v2 instead of an old mechanical SCSI drive.
  • SSD, Ethernet and a clock port in one slot: the Multiface, described in my Multiface guide.
  • Phase 5 Fastlane Z3 owners: the Fastlane needs ROM version 8 or later to work with a 68060. The Fastlane Z3 ROM Update 8.5 is the last release.
  • A4000 internal IDE: the Amiga 4000 IDE Expansion lets the A4000 desktop use both IDE channels, up to four devices.

My Recommendations

  • Amiga 4000(T): the BFG9060 with the MC68060RC50 revision 6 and the high-profile heat sink/fan module. Run it at 50 MHz, and try turbo mode if you like.
  • Amiga 3000(T): the same board with the MC68060RC50 revision 6, with the low-profile module in the desktop A3000. Check the Kickstart ROM first and plan for the DMAC or a separate drive controller.
  • 060 speed on a budget: the BFG9060 with the MC68LC060RC50.
  • Amiga 1200: see my guide Upgrading the Amiga 1200 with a 68060 CPU.

Ready for 060 speed? Every BFG9060 comes with a two-year warranty. Choose your CPU and options on the BFG9060 product page. Not sure what fits your machine? Contact me and tell me what you have.
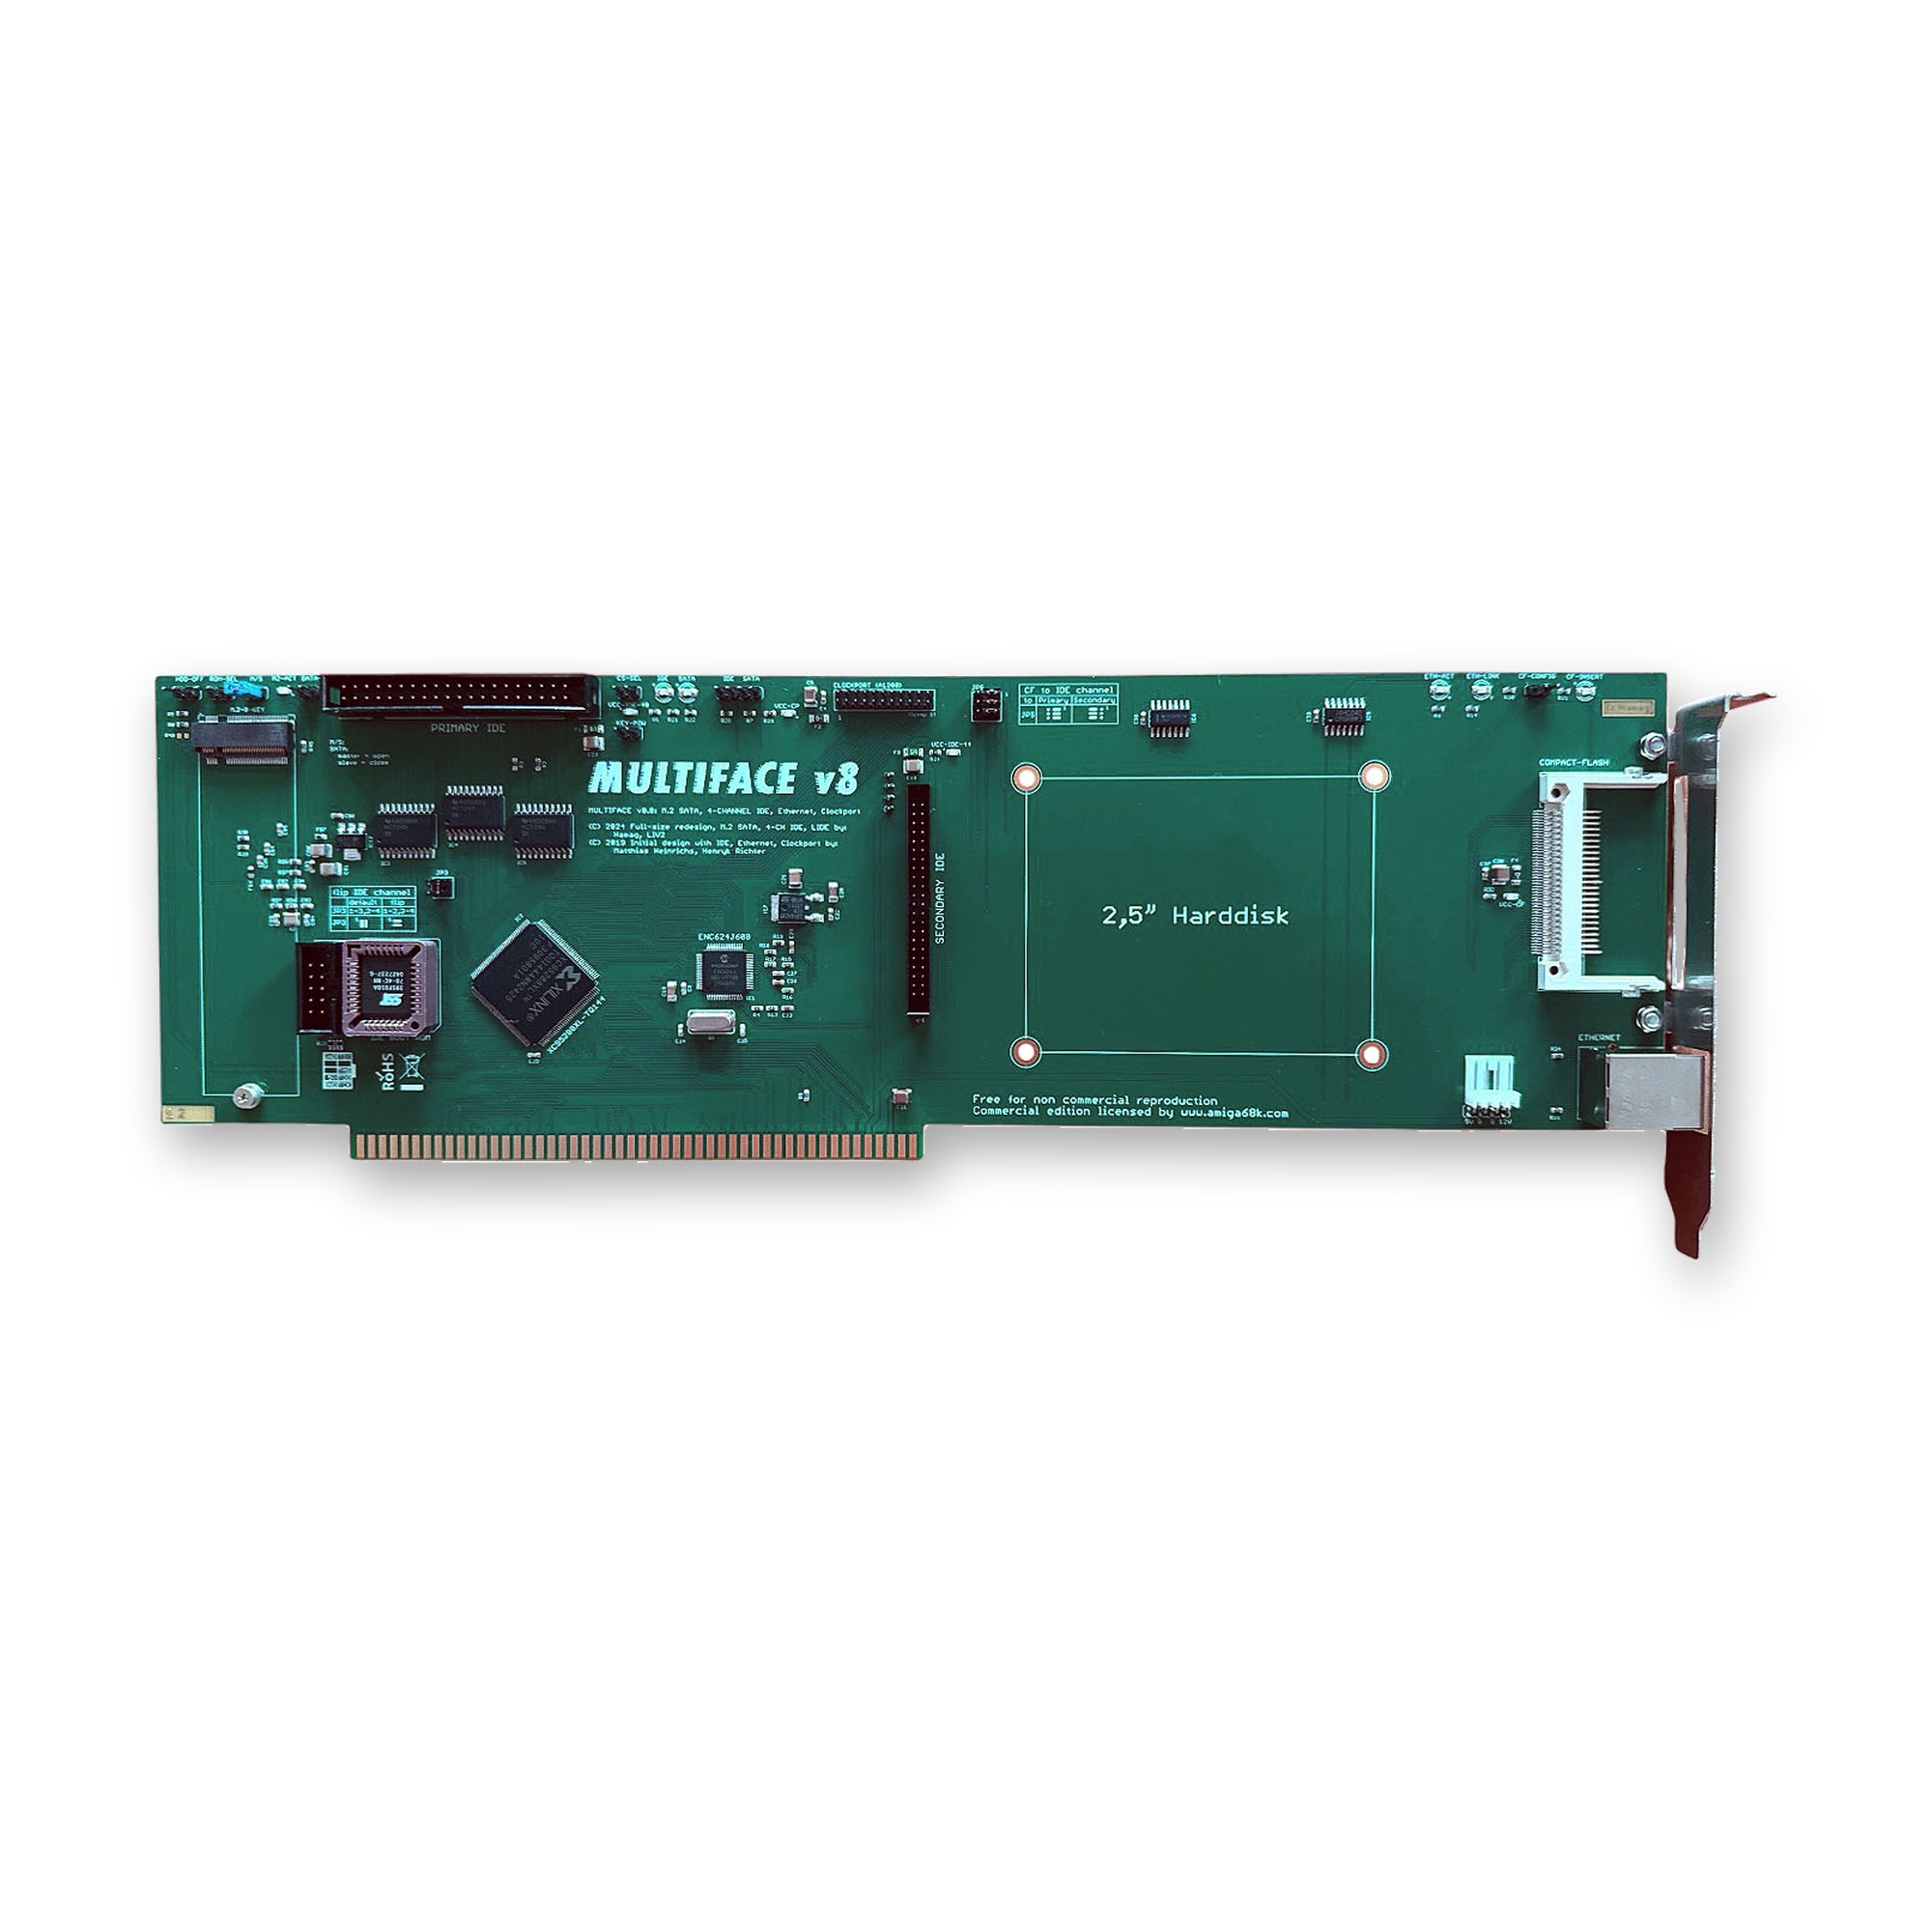
Posted on

Multiface: SSD, Ethernet and a Clock Port in One Zorro Slot

Multiface - SATA / M.2 / IDE / LAN / Clockport

Imagine your Amiga 2000, 3000 or 4000 booting silently from an SSD, sharing files with your PC over the network and playing 16-bit sound from a clock port card, all from a single Zorro slot. That is what the Multiface does. This guide shows what the card makes possible, how its storage connectors and jumpers work together, and how to get the drives and the network running.

What the Multiface Opens Up

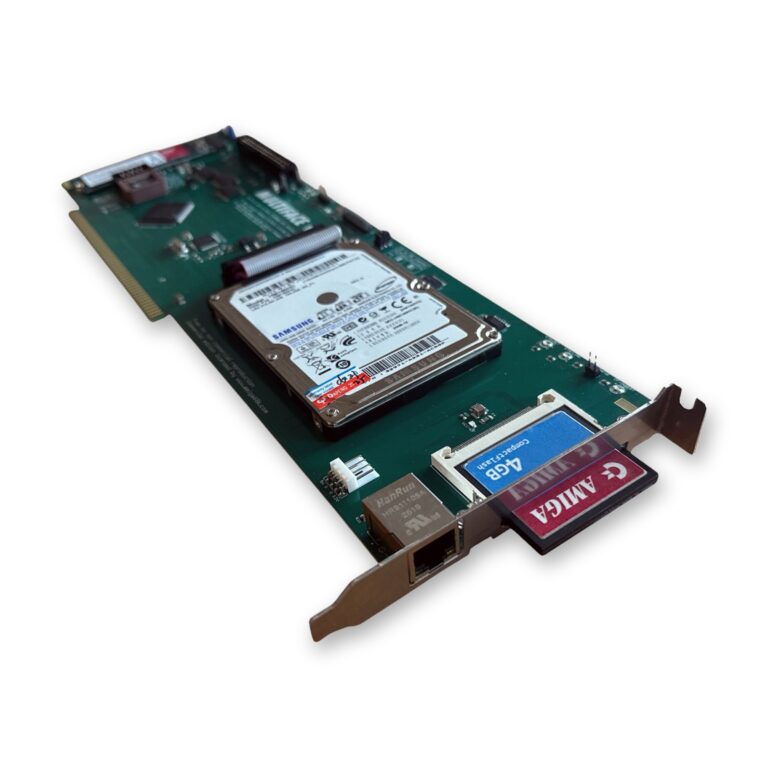
Multiface Zorro card with a 2.5-inch drive and a Compact-Flash card
The Multiface with a 2.5″ drive on the board and a Compact-Flash card in the bracket slot.
  • Silent, fast SSD storage: an M.2 or SATA SSD replaces a noisy, failing old hard drive, with room for AmigaOS 3.2, all your programs and a whole WHDLoad game collection.
  • A CD or DVD drive on the second IDE channel, for CD-ROM software and audio CDs.
  • Compact-Flash you can reach from outside: a slot on the card’s bracket for an extra drive or for moving data, without opening the case (switch the Amiga off first).
  • Your Amiga on the network: copy files to and from your PC or NAS over SMB or FTP, download from Aminet directly, read email, chat on IRC, log in by Telnet or SSH.
  • A clock port for A1200-compatible expansions such as a USB interface or a 16-bit sound card.
  • More free slots: four functions in one card leave the other Zorro slots for a graphics card or other expansions.

One Card, Four Jobs

Big-box Amigas have Zorro slots, but every card takes one, and many older cards do just one thing. The Multiface combines four functions on one full-length Zorro card:

  • a 2-channel IDE interface (primary and secondary) for up to four IDE/ATAPI devices at the same time
  • a SATA SSD or an M.2 B-key storage device (one of them, not both at the same time)
  • a fast Ethernet port for your network and the Internet
  • an A1200-compatible clock port for expansions such as a USB interface or a 16-bit sound card

The card works in every Amiga with Zorro II or Zorro III slots. The IDE interface runs in Zorro II mode on all Amigas. In the A3000(T) and A4000(T), the Ethernet interface switches to Zorro III mode.

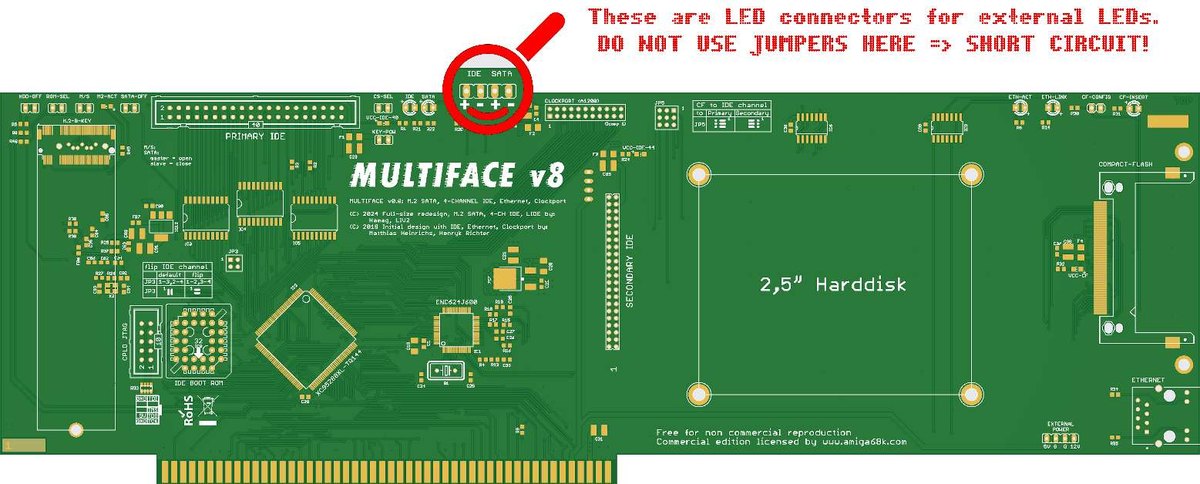
Multiface board layout with connectors and jumpers
Board layout from the manual. The two pin headers marked in red are LED connectors, never jumpers.

Four Ways to Connect Storage

  • IDE-40: the classic dual-row 40-pin connector at the top of the card, for hard drives and optical drives (CD-ROM, CD-RW, DVD-ROM, DVD-RW and so on).
  • IDE-44: the 44-pin connector in the middle of the card. The four extra pins carry power, so 2.5-inch laptop drives and Compact-Flash adapters need no separate power cable.
  • Compact-Flash: a slot on the right edge of the card that you can reach from outside the case. It is not hot-swappable: always switch the Amiga off before you insert or remove a card.
  • SATA or M.2: an M.2 socket on the front of the card and a SATA socket at the top of the back. A JM20330 chip translates between parallel and serial ATA. Use one of the two, never both at the same time.

Choosing an M.2 SSD

Not every M.2 SSD works. The card needs a SATA SSD, not an NVMe one:

  • SSD type: M.2 SATA SSD (NVMe is not supported)
  • interface SATA III, protocol AHCI (SATA)
  • form factor M.2 2280
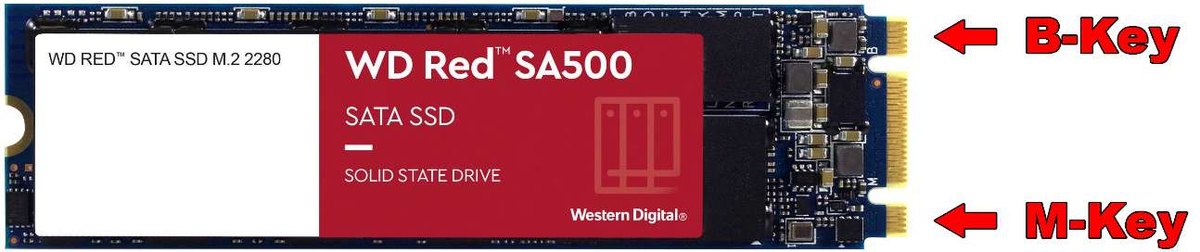
  • both a B-key and an M-key notch on the connector (drives with only an M-key are NVMe)
M.2 SATA SSD with B-key and M-key notches
A suitable M.2 SATA SSD: notches for both the B-key and the M-key.

How the Drives Are Assigned

Each IDE channel takes two devices, one master and one slave. The card comes set up like this:

Channel Master Slave
Primary IDE IDE-40 Compact-Flash
Secondary IDE IDE-44 SATA/M.2

Factory setting: M/S closed, JP3 in its default position, all three JP5 jumpers on the right, all other jumpers open. The jumpers along the top edge change that:

Jumper What it does
HDD-OFF Closed switches both IDE channels off; open (default) leaves them on.
M/S Open: SATA/M.2 is master and IDE-44 slave. Closed: SATA/M.2 is slave and IDE-44 master.
SATA-OFF Disables the SATA/M.2 interface, so the Compact-Flash slot can move to the secondary channel and the primary channel takes two more devices.
CF-CONFIG Open: Compact-Flash is slave. Closed: Compact-Flash is master.
JP5 All three jumpers on the right: Compact-Flash on the primary channel. All three on the left: on the secondary channel.
JP3 Swaps the primary and the secondary channel.
CS-SEL Sets master/slave from outside for drives without their own jumper, such as slim CD/DVD drives.
KEY-POW Puts +5 V on pin 20 of the IDE-40 connector, for example to power some Compact-Flash adapters without an extra cable.
ROM-SEL Selects an alternative driver in the boot EPROM, which has room for more than one.

One warning: the two small pin headers labelled “IDE” and “SATA” near the middle of the upper edge, next to the two LEDs, are for external LEDs, for example on the case front. Never put a jumper on them: that causes a short circuit.

Setting Up the Drives

The card uses the open-source LIDE driver. It sits in the boot ROM of the card, starts with AmigaOS, and you can boot from the drives. For large drives I strongly recommend AmigaOS 3.2 or newer.

  1. Open the Tools drawer, select the HDToolBox icon and choose Information from the menu.
  2. Check that the Tool Types contain SCSI_DEVICE_NAME=lide.device, then save.
  3. Start HDToolBox, then set up and partition the drives. Set Automount for every device.
  4. For Compact-Flash cards, always set Mask to 0x7FFFFFFE and MaxTransfer to 0x1FE00.
  5. CD and DVD drives are mounted with CD0:/CD1: entries in SYS:Devs/. Unit 0 is primary master, unit 1 primary slave, unit 2 secondary master and unit 3 secondary slave.

In normal use the IDE interface transfers between 1.6 MB/s and 2.6 MB/s.

Getting Your Amiga Online

With the Ethernet port your Amiga can exchange files with Linux, Windows and macOS computers over SMB or FTP, browse the web, send email with SimpleMail or YAM, and log in to other machines by Telnet or SSH. You need a TCP/IP stack such as RoadShow, AmiTCP, MiamiDX or Genesis, and a browser such as iBrowse 2.4 with AmiSSL, Voyager or AWeb.

The network driver is on the supplied floppy disk. On an Amiga with a 68020 or faster CPU, copy enc624j6net.device to SYS:Devs/Networks/, then install the TCP/IP stack and the browser. With an original 68000 CPU, copy enc624j6net.device_68000 instead and rename it to enc624j6net.device. For 68000 machines RoadShow is the recommended TCP/IP stack.

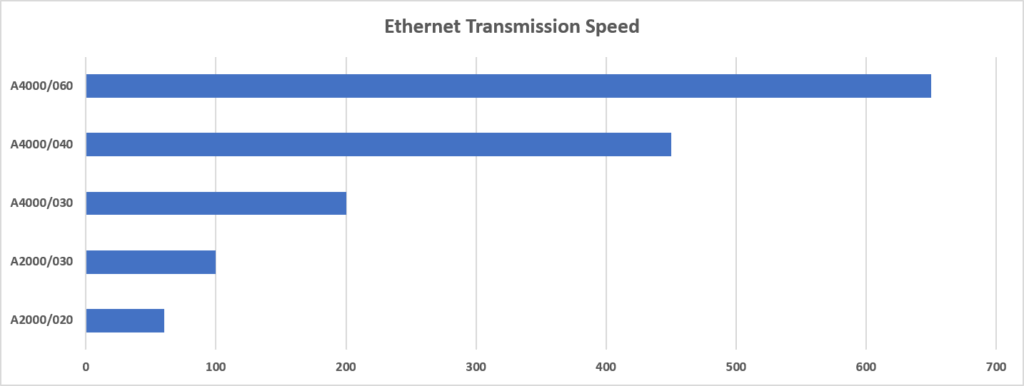
How fast is it? Processing network data in the TCP/IP stack is hard work for the CPU, so the speed depends mostly on the processor. An Amiga 2000 with a 68020 can expect up to 100 kB/s. An Amiga 4000 with a 68060 easily reaches over 600 kB/s, and a 68030 or 68040 lands in between. When you measure, make sure the server you download from provides enough bandwidth. A faster CPU therefore pays off twice: see my guides on the TK68030v2 for the A500 and A2000 and on upgrading the A3000/4000 with a 68060.

Ethernet transfer speed of the Multiface by Amiga model and CPU
Ethernet transfer speed in kB/s by Amiga model and CPU, from the A2000 with a 68020 to the A4000 with a 68060.

My guide Getting Your Amiga Online compares the network options for the other Amiga models.

The Clock Port

The clock port takes the same expansions as the clock port of the Amiga 1200, for example a USB interface or a 16-bit sound card. In a big-box Amiga, that gives you these extras without another Zorro slot.

Updating the Driver

You can update the LIDE driver in the EPROM from the Amiga itself, without an EPROM programmer. Download the ADF of the latest release from the lide.device releases on GitHub (for example lide-update-40.10.adf). Write it to a floppy disk, for example with ADFer from aminet.net, or start it from a Gotek drive. The disk boots straight into the update.

If Something Does Not Show Up

  • Only the devices of one channel appear on the Workbench: check that each channel has one master and one slave, that Automount is set in HDToolBox for every device, and try swapping the channels with the two JP3 jumpers.
  • The Compact-Flash card does not appear, or a second device on the same channel causes trouble: check Mask 0x7FFFFFFE and MaxTransfer 0x1FE00 in HDToolBox.
  • Unstable drives: measure the +5 V rail on the card with a multimeter. If it is below 4.85 V, connect a floppy power cable from the power supply to one of the floppy power connectors on the card.

Multiface or Something Else?

  • Multiface: the all-in-one card for the A2000, A3000(T) and A4000(T) when you want SSD storage, Ethernet and a clock port in one slot.
  • Multiface Mini: the smaller predecessor with Ethernet, a BSC AT-Bus compatible IDE controller with auto-boot ROM (Kickstart 1.3 to 3.2) and a clock port, for big-box Amigas and an A500 with a Zorro interface. It has no SATA, M.2 or Compact-Flash slot.
  • Maximum storage speed in an A3000(T) or A4000(T): the Zorro III DMA SCSI controller ReA4091 with a BlueSCSI v2 reaches 6-8 MB/s in practice. It needs a Super Buster 11 chip.
  • A4000 desktop, storage only: the Amiga 4000 IDE Expansion lets the built-in IDE port use both channels, up to four devices.

Who Made It

The first design from 2019, with IDE, Ethernet and the clock port, came from Matthias Heinrichs and Henryk Richter. In 2024 Sven redesigned it as a full-length Zorro card with the SATA/M.2 interface, two IDE channels and the Compact-Flash slot. The LIDE driver is developed by LIV2. I sell this version of the Multiface under an official licence from Sven and pay a royalty for every card.

The full manual is available in English (PDF) and German (PDF).

One slot, four upgrades. Give your big-box Amiga SSD storage, a network connection and a clock port in one go with the Multiface. Not sure which card fits your Amiga? Contact me.

Posted on

TK68030v2: Speed, Fast RAM and IDE for the Amiga 500 and 2000

TK68030v2

An Amiga 500 or 2000 with a 68030, an FPU, up to 128 MB of Fast RAM and a bootable Compact-Flash card, all from one board in the CPU socket: that is the TK68030v2. This guide shows what it makes possible, how fast it is, and how to fit and set it up.

What the TK68030v2 Opens Up

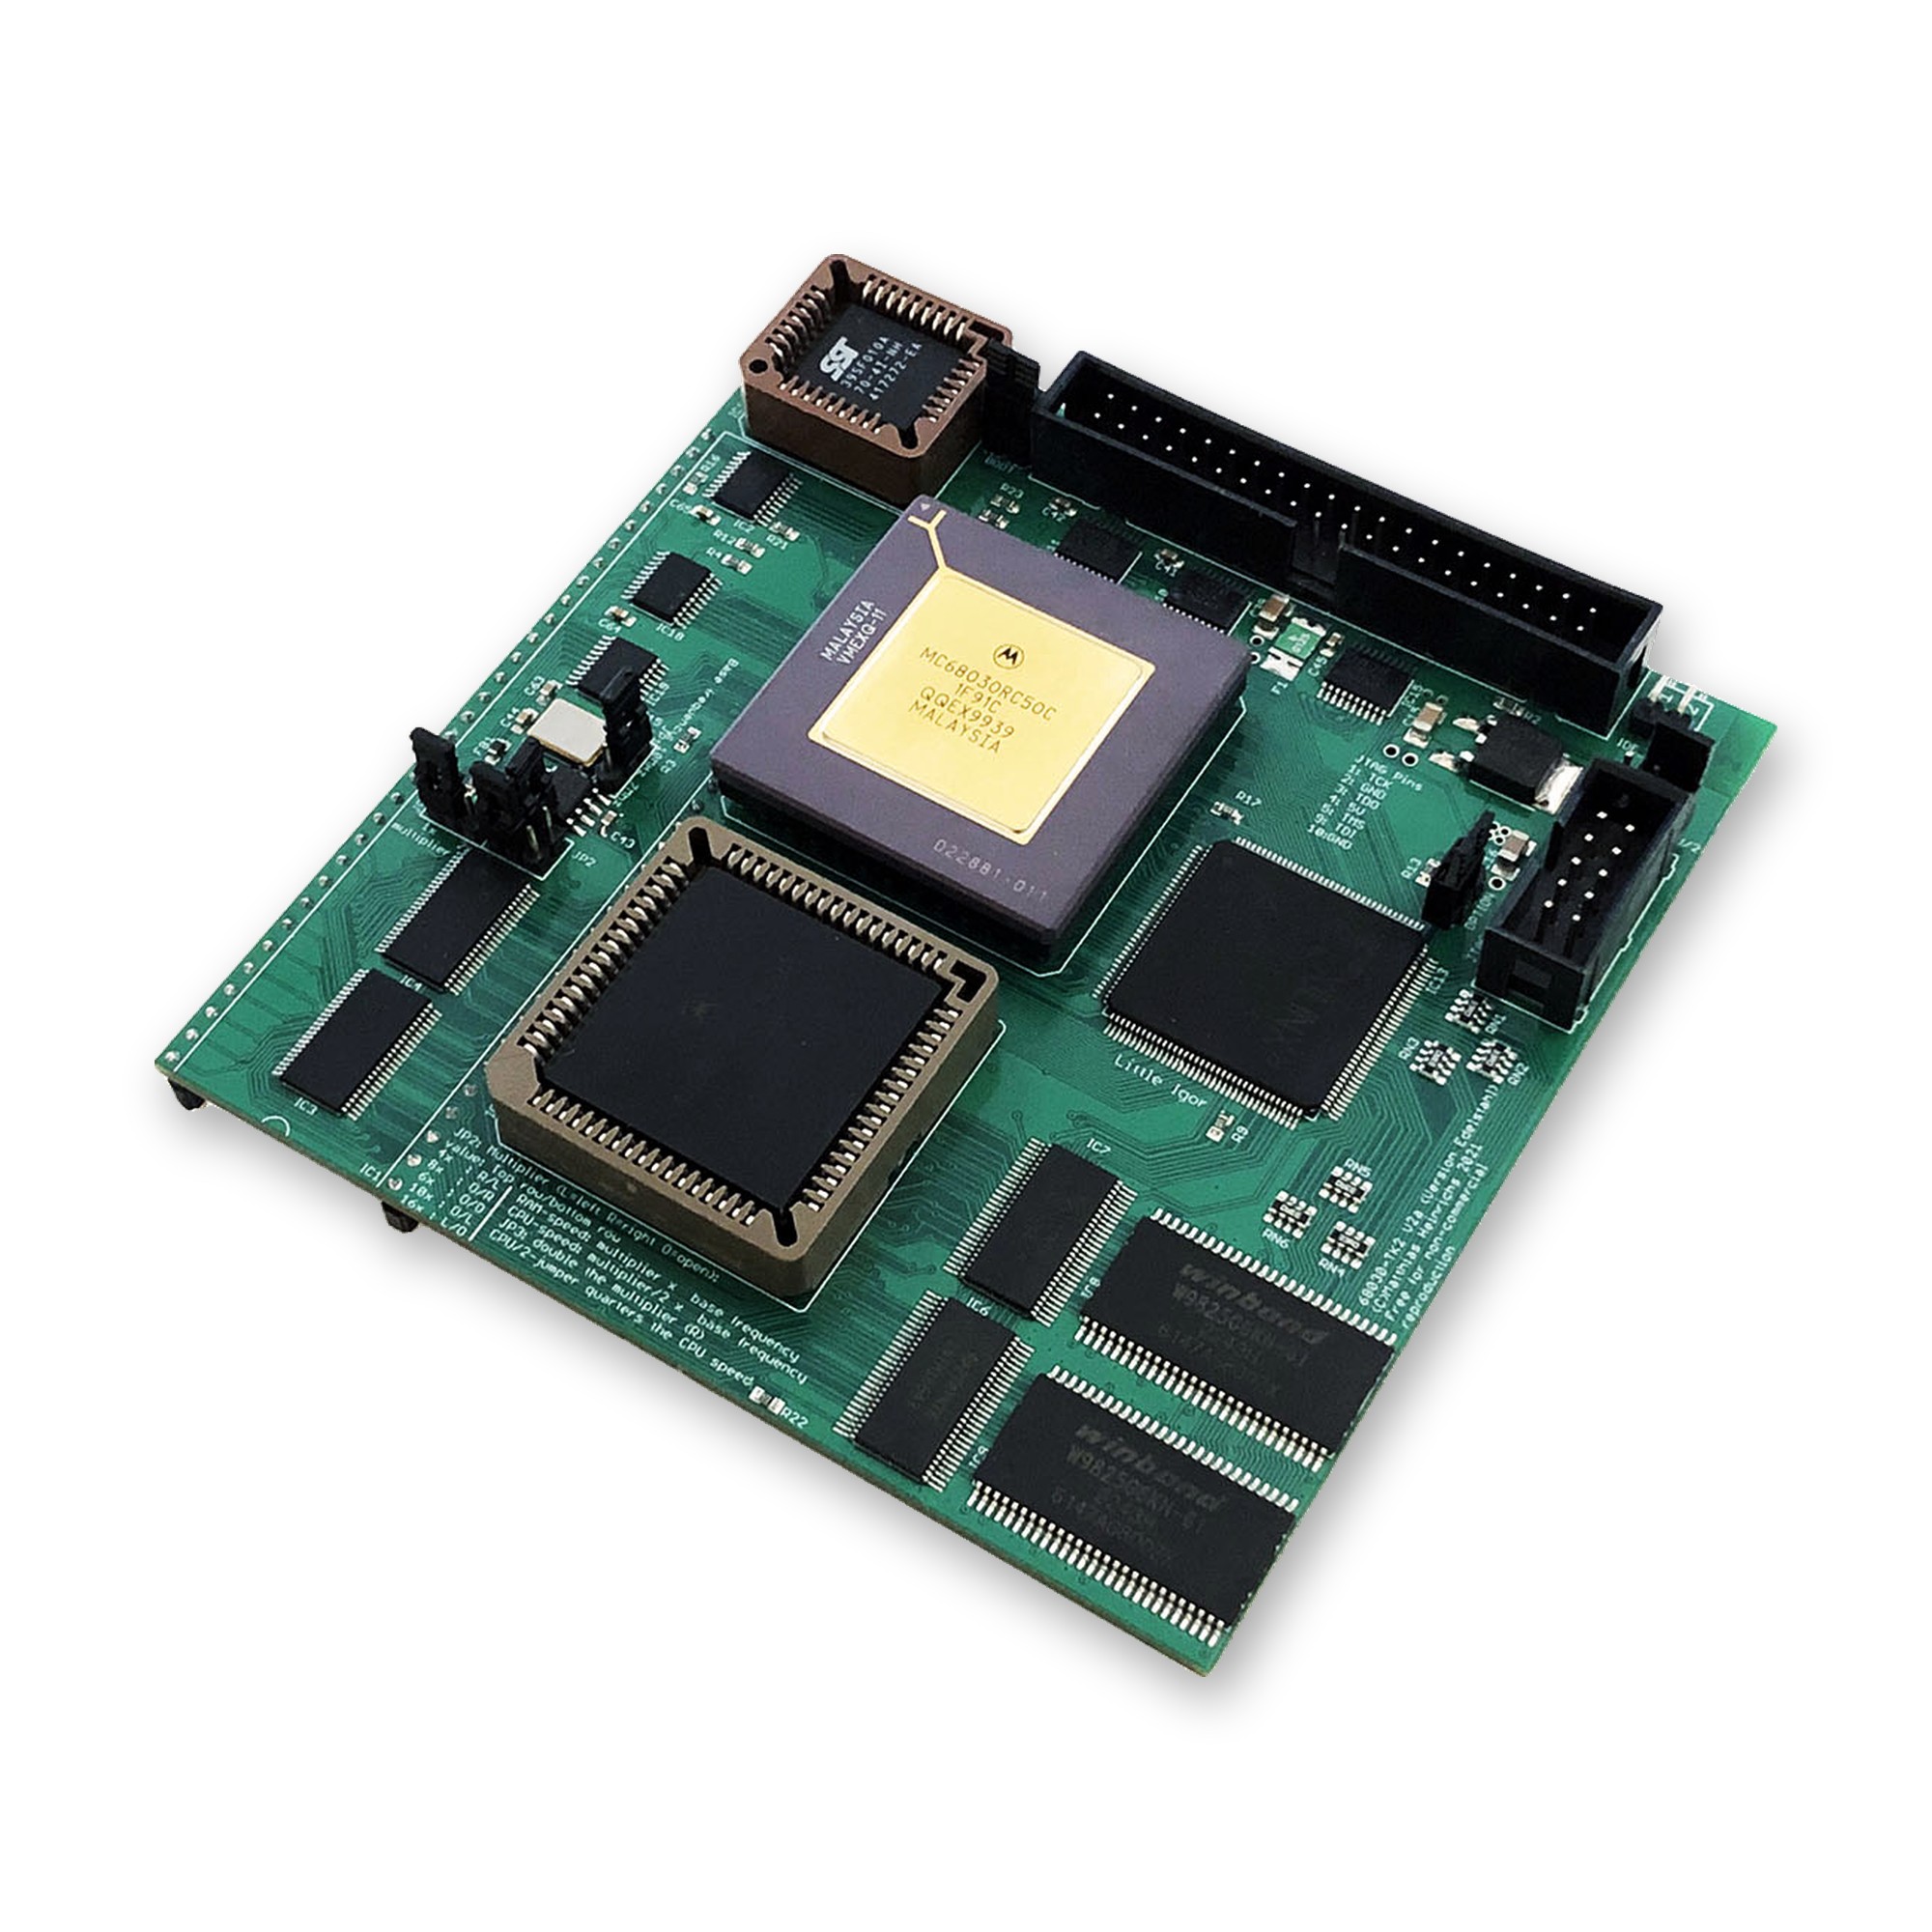
TK68030v2 accelerator board with 68030 CPU, 68882 FPU and IDE port
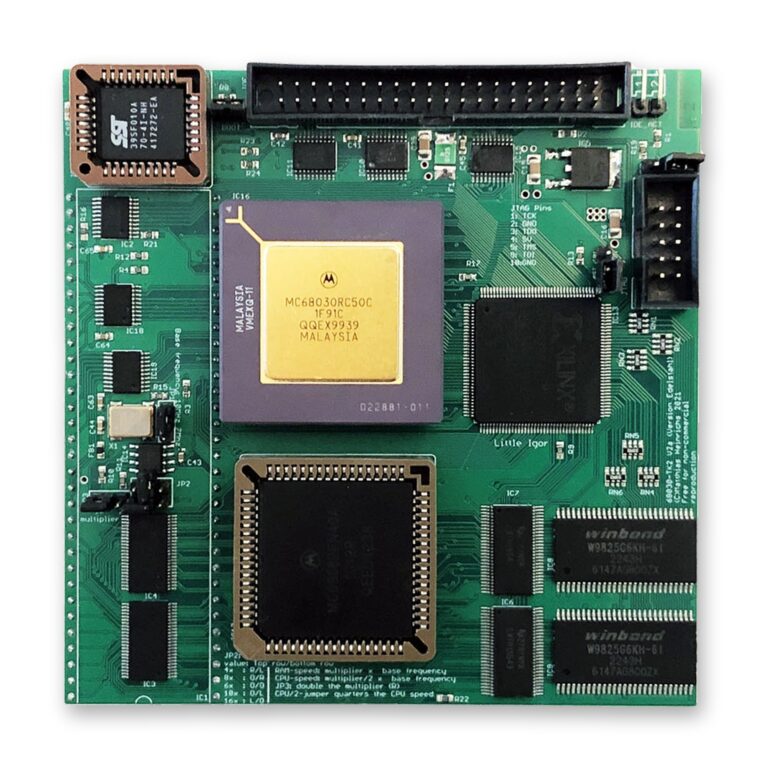
The TK68030v2: MC68030 CPU, MC68882 FPU, Fast RAM and the IDE port along the top edge.

A stock Amiga 500 or 2000 runs a 68000 at 7 MHz, usually with little or no Fast RAM and no hard drive. The TK68030v2 changes all three at once:

  • A hard drive without a side expansion: the on-board IDE port with its auto-boot ROM boots from a Compact-Flash card or a hard drive. No more disk swapping.
  • WHDLoad: install your games to the drive and start them from Workbench. WHDLoad needs Fast RAM, and the TK68030v2 brings 64 MB or 128 MB.
  • AmigaOS 3.2 on an A500: a modern Workbench with room to breathe, and with MMULib and MuFastRom the Kickstart runs from fast memory.
  • Software that was out of reach: programs that need a 68020 or better, an FPU or plenty of memory, such as image processing, 3D rendering with the 68882 FPU, or a TCP/IP stack and a browser.
  • A faster network: networking is CPU-bound, so a Plipbox or a Zorro network card in an A2000 gets noticeably quicker with a 68030.

How Fast Is It?

SysInfo screenshot of an Amiga with TK68030v2 at 51.8 MHz
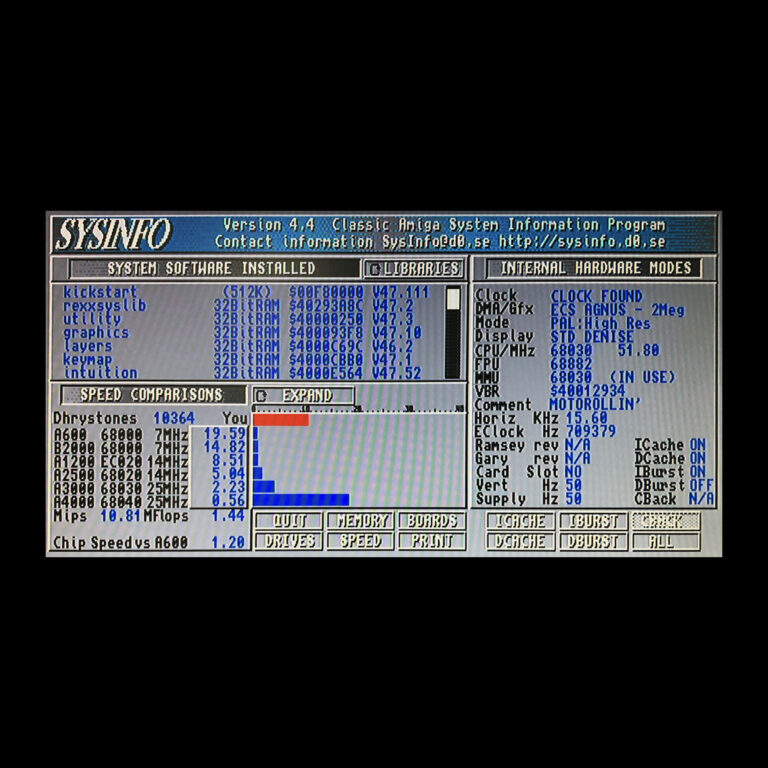
SysInfo with the TK68030v2: 68030 at 51.8 MHz with 68882 FPU.

These values come from SysInfo on my test machine with a TK68030v2 at 51.8 MHz:

SysInfo TK68030v2 at 51.8 MHz
Dhrystones 10,364
MIPS 10.81
Compared with an A600 (68000, 7 MHz) 19.59 times faster
Compared with a B2000 (68000, 7 MHz) 14.82 times faster
Compared with an A1200 (EC020, 14 MHz) 8.51 times faster
Compared with an A3000 (68030, 25 MHz) 2.23 times faster

At 50 MHz the TK68030v2 is more than twice as fast as a stock Amiga 3000, and in many cases it runs at up to 66 MHz.

The TK68030v2 at a Glance

The TK68030v2 is designed by Matthias Heinrichs. I build it under his official licence and pay a royalty for every board. It offers:

  • a Motorola 68030 CPU, overclockable up to 66 MHz
  • a Motorola 68882 FPU
  • 64 MB or 128 MB of Fast RAM, running at up to 120 MHz
  • an IDE controller with an on-board auto-boot ROM for hard drives and Compact-Flash cards, with the open-source LIDE driver (lide.device), which outperforms the old BSC AT-Bus / Oktapussy driver in every respect
  • a CPU speed set by jumpers: 14, 15, 17, 20, 25, 28, 30, 35, 40, 50 or 66 MHz

My factory configuration: MC68030RC50 CPU and MC68882 FPU, both tested at 50 and 66 MHz, 128 MB of 32-bit Fast RAM and the LIDE ROM v40.12.

Installing the Board

TK68030v2 board layout with IDE port, boot ROM and jumpers
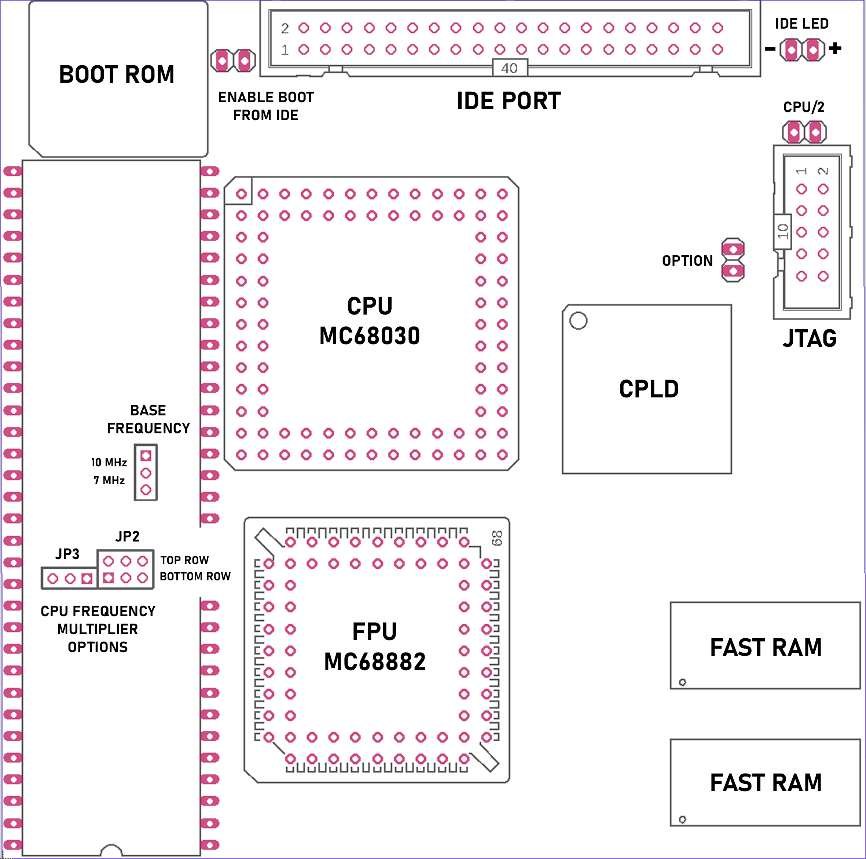
Board layout: IDE port, boot ROM, ENABLE BOOT FROM IDE, the frequency jumpers JP2, JP3 and CPU/2, and the IDE LED header.

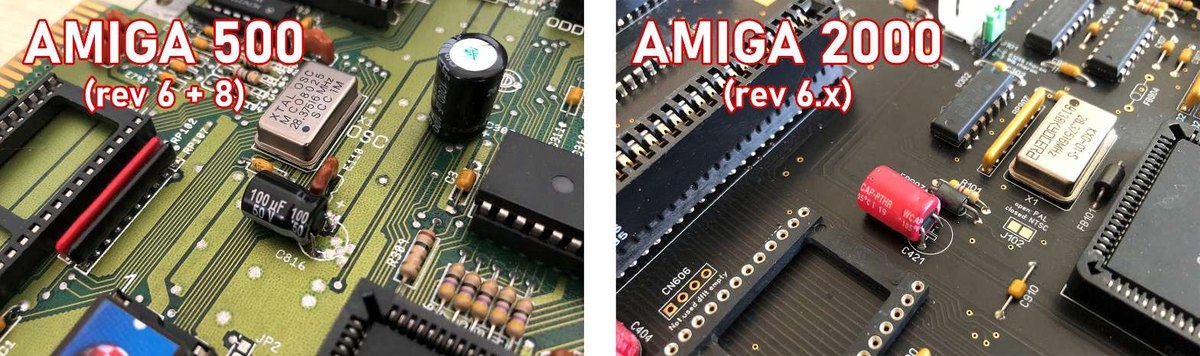
The TK68030v2 goes into the 68000 CPU socket. In most A500 and A2000 models it touches a capacitor next to the socket:

Mainboard Capacitor What to do
Amiga 500 rev 3 and rev 5 C307 Should not be a problem
Amiga 500 rev 6 and rev 8 C816 Bend it to the side
Amiga 2000 rev 4.x None in the way Nothing to do
Amiga 2000 rev 6.x C421 Bend it to the side
Capacitors next to the 68000 socket on the Amiga 500 rev 6/8 and Amiga 2000 rev 6.x
The capacitors to bend aside: C816 on the A500 rev 6 and 8, C421 on the A2000 rev 6.x.
  1. Bend the capacitor 90 degrees to the side, so that it lies flat on the mainboard.
  2. Check all pins of the TK68030v2 and straighten any bent pin carefully with tweezers.
  3. Remove the old 68000 CPU if it is still in place.
  4. Insert the TK68030v2 carefully into the 68000 socket, press it down and check that it lies flat and level.
  5. If you boot from a drive on the TK68030v2, close the ENABLE BOOT FROM IDE jumper.

Setting Up the Software

  • Drives: the IDE devices are reached through lide.device. In HDToolBox (right-click, Information), check the Tool Types, then partition the Compact-Flash card or hard drive. More about the driver: the LIDE project on GitHub.
  • MMULib: to get the most out of the board, install the MMULib package from aminet.net, or the MMULib that comes with AmigaOS 3.1.4 or 3.2.
  • Kickstart in Fast RAM: loading the Kickstart ROM into Fast RAM boosts performance noticeably. Add C:MuFastRom PROTECT ON to your S:Startup-Sequence after the SetPatch command and restart.

Choosing the CPU Speed

The board has a 10 MHz oscillator, so leave the base frequency jumper at 10 MHz. Three jumpers set the speed:

  • JP2, the multiplier: CPU speed = multiplier / 2 × 10 MHz, RAM speed = multiplier × 10 MHz. A 10× multiplier gives 50 MHz for the CPU and 100 MHz for the RAM. Always set these jumpers horizontally, never vertically.
  • JP3 doubles the multiplier: 6× doubled to 12× gives 60 MHz for the CPU and 120 MHz for the RAM.
  • CPU/2 halves the CPU speed without touching the RAM speed.

A few rules for higher speeds: every frequency above a CPU’s rating is overclocking, and the MC68030RC50 is rated for 50 MHz. CPU and FPU run at the same frequency, so a slower FPU can hold the CPU back; the board also runs without an FPU. For the highest speed of 66 MHz, your Amiga should have new, high-quality capacitors, because they matter for the signal quality. Above 50 MHz, check the CPU temperature and use active cooling, a heat sink with a fan: overheating can destroy the CPU.

Complete the Upgrade

My Recommendations

  • Amiga 500: the TK68030v2 with 128 MB and a Compact-Flash card on its IDE port: CPU, memory and bootable storage in one board, with no side expansion needed.
  • Amiga 2000: the TK68030v2 in the CPU socket, plus a Multiface card in a Zorro slot for the network.
  • For speed beyond 50 MHz: fresh capacitors in the Amiga and a heat sink with a fan on the CPU.

Turn your A500 or A2000 into a 68030 machine. Choose the memory size on the TK68030v2 product page. Questions about your mainboard revision? Contact me. Support and background: the official support thread on a1k.org and the project page.

Posted on

Upgrading the Amiga 1200 with a 68060 CPU

TF1260 - 68060 CPU Accelerator Board with 128 MB Fast-RAM for Amiga 1200

Imagine your Amiga 1200 opening windows the moment you click, starting your whole games collection from a Compact-Flash card and playing MP3 files while you work. That is what a 68060 accelerator with 128 MB of Fast RAM does for the machine.

This guide is for A1200 owners who want that step. It shows what the upgrade opens up, which CPU to choose for the TF1260 and how to get the software right on the first start.

What a 68060 Opens Up

A stock A1200 has a 68EC020 at 14 MHz and 2 MB of Chip RAM, which the CPU shares with the graphics and sound chips. There is no Fast RAM at all. The 68060 is the fastest CPU of Motorola’s 68k family, and on the TF1260 it comes with 128 MB of Fast RAM that belongs to the CPU alone. Here is what that changes:

  • A Workbench that keeps up with you. AmigaOS 3.2 on a high-resolution screen, many windows, background tools: directories list, windows open and programs start without the waiting you know from a stock machine.
  • Your games on the hard drive. WHDLoad installs games and demos to a hard drive or Compact-Flash card and starts them from Workbench. Many installs need more memory than 2 MB of Chip RAM; with 128 MB of Fast RAM there is room to spare, and you quit back to Workbench when you are done.
  • Image and sound work. Programs such as ImageFX or Personal Paint apply filters and convert pictures much faster, and long samples fit comfortably into memory.
  • MP3 playback. Decoding MP3 files is too much for a stock 68EC020. A 68060 plays them in real time with players such as AmigaAMP.
  • Doom and Quake. The Amiga ports of Doom run well on a 68060, and the 68k ports of Quake are written for a 68060 with FPU.
  • 3D rendering. With the FPU of the full MC68060, renderers such as Imagine or LightWave work through scenes far faster than any stock Amiga could.
  • The web. With a network connection, iBrowse and AmiSSL bring HTTPS websites to the Amiga. Encryption is hard work for a 68k CPU, and the 060 makes it usable. Simple sites work well; modern script-heavy sites remain out of reach.

Measured on My Test Machine

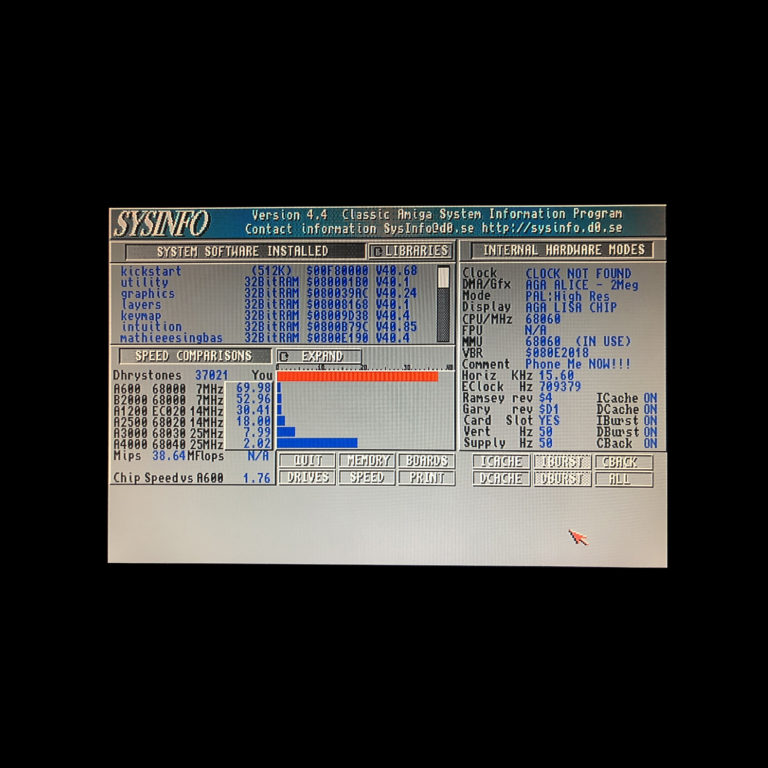
SysInfo speed screen of an Amiga 1200 with a TF1260 and MC68LC060 CPU
SysInfo on my A1200 with the TF1260 and an MC68LC060.

SysInfo on my own test machine, an A1200 with a TF1260 and the MC68LC060RC50, reports 37021 Dhrystones and 38.64 MIPS. SysInfo also compares the result with classic Amiga models:

Compared with SysInfo factor
A600 (68000, 7 MHz) 69.98 times as fast
Stock A1200 (68EC020, 14 MHz) 30.41 times as fast
A3000 (68030, 25 MHz) 7.99 times as fast
A4000 (68040, 25 MHz) 2.02 times as fast

In plain words: in this test the TF1260 makes an A1200 about 30 times as fast as it left the factory, and twice as fast as an A4000 with its 68040. That is the LC version; the Dhrystone test measures integer speed, so the FPU of the full MC68060 plays no part in it.

What the TF1260 Offers

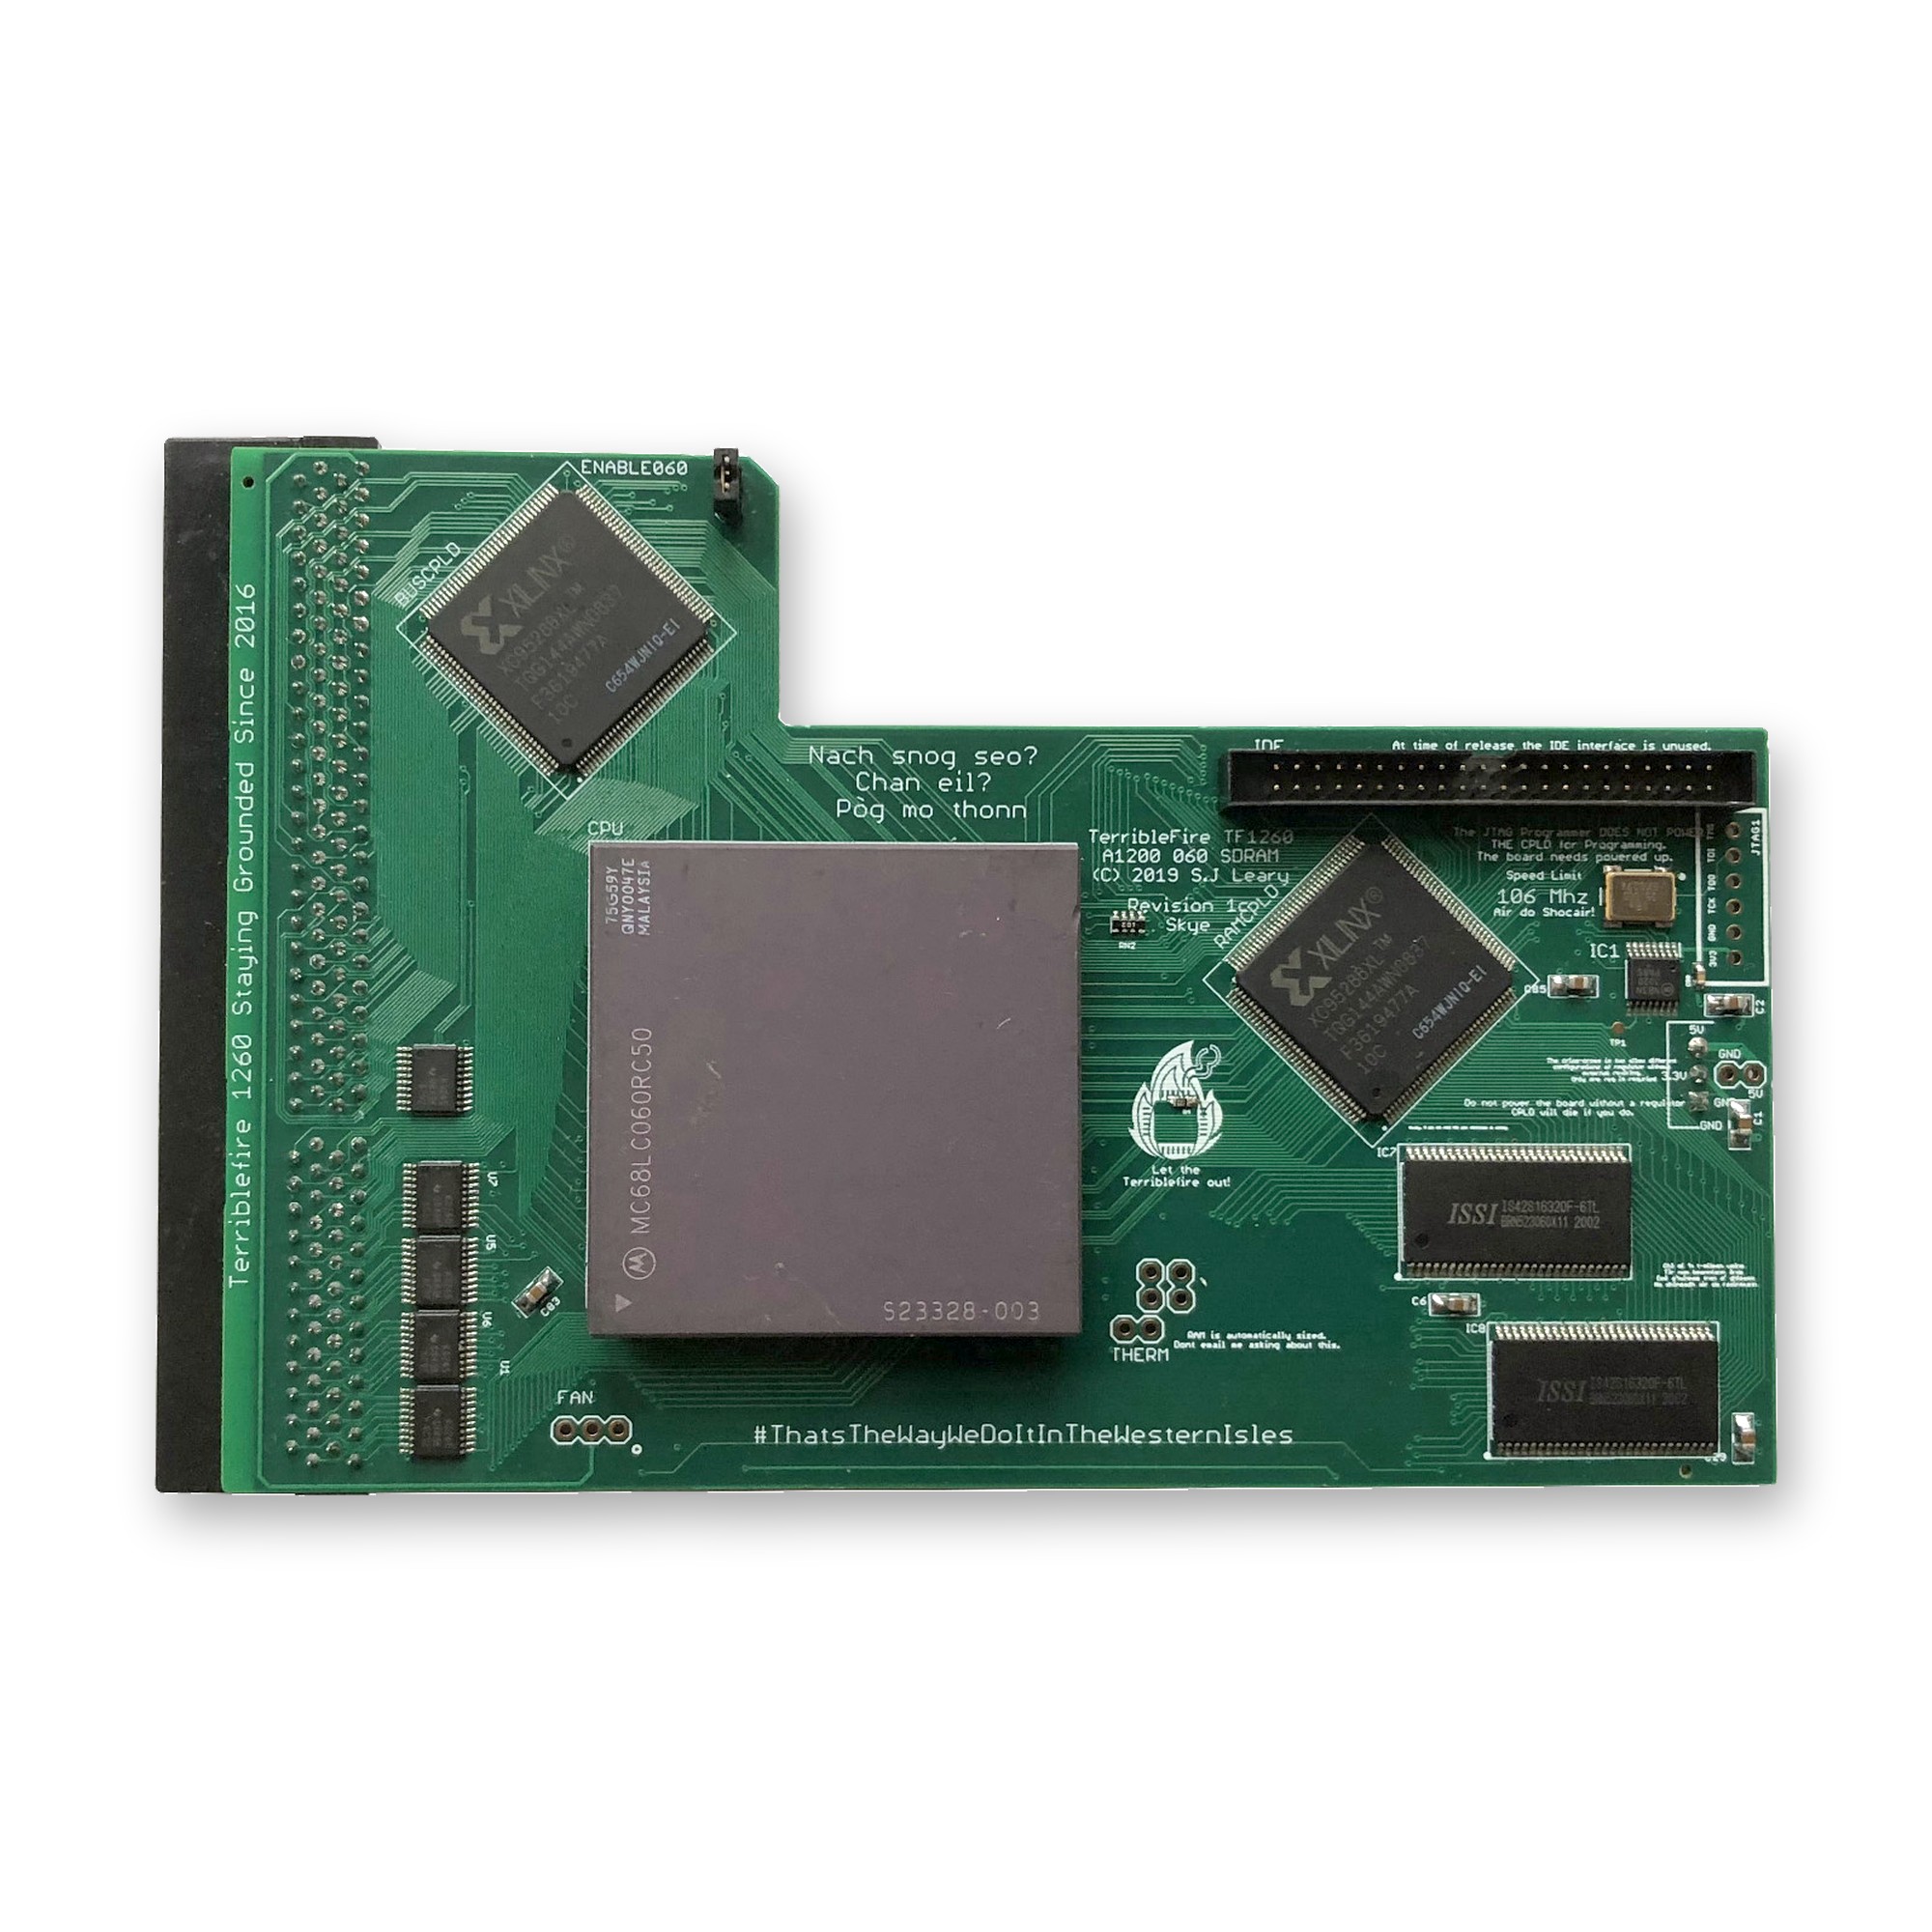
TF1260 68060 accelerator board for the Amiga 1200, top side
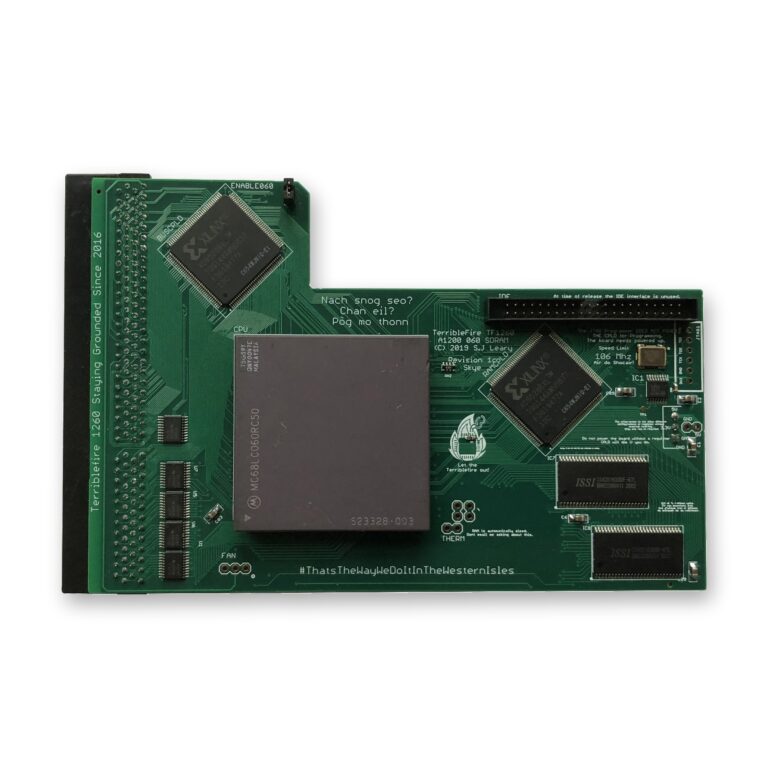
The TF1260 accelerator for the Amiga 1200.
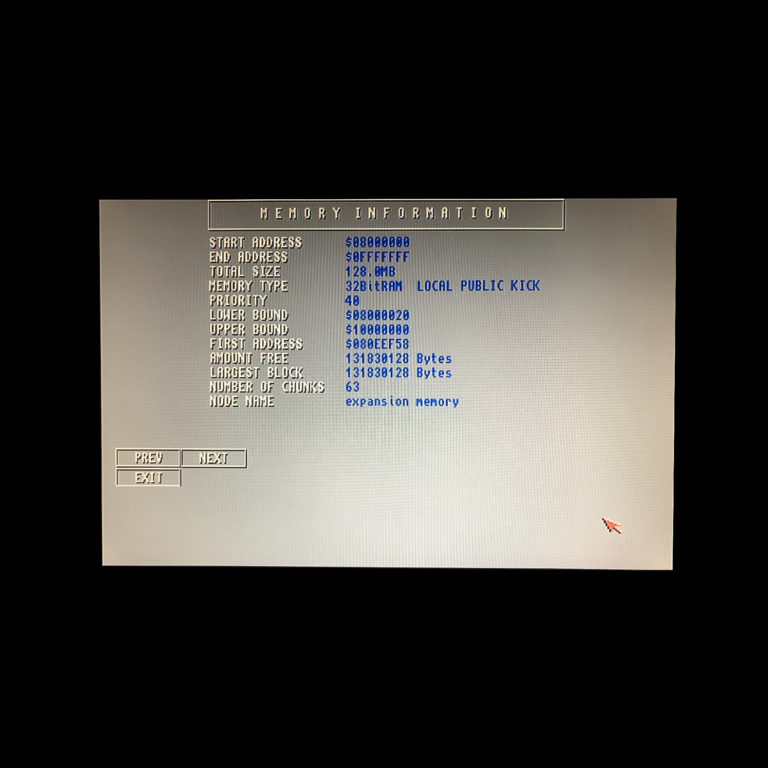
SysInfo memory screen showing 128 MB of Fast RAM on an Amiga 1200 with TF1260
128 MB of Fast RAM, as SysInfo sees it.

The TF1260 is a brand-new, professionally built 68060 accelerator for the Amiga 1200. It fits the expansion slot under the trapdoor and comes with:

  • a choice of CPU: MC68060RC50 or MC68LC060RC50
  • 128 MB of Fast RAM with 60 ns access time
  • a high-quality PCB with immersion gold surface finish
  • a floppy disk with the 68060 library files
  • a two-year warranty in case of defect (no warranty for overclocked CPUs)

MC68060 or MC68LC060: the FPU Question

Both CPUs run at 50 MHz and have an MMU (memory management unit). The difference is the FPU, the floating point unit that does fast maths with decimal numbers:

  • The MC68060RC50 has a built-in MMU and FPU. It runs everything, including the 3D renderers and Quake ports above, and you never have to think about it when you install software.
  • The MC68LC060RC50 has an MMU but no FPU. It is the low-cost option, and software that requires an FPU will not run on it.

The vast majority of Amiga software does not need an FPU. Workbench, most applications and games run at full 060 speed on the LC version. There is one habit to learn: when an installer asks for your CPU and offers no 060 option without FPU, choose the 020/030 version. That installs the program without FPU support, but it still runs at the full speed of the 060.

If 3D rendering or Quake is part of why you want a 68060, choose the full MC68060RC50.

CPU Revisions and Masks in Plain Words

Motorola revised the 68060 several times, each time with new photo masks; the mask code printed on the chip tells you the revision. “RC50” stands for a nominal 50 MHz.

  • MC68060RC50 revision 6, mask 71E41J: the latest revision Motorola produced, with MMU and FPU, and well suited to overclocking. I sell it on its own as the MC68060RC50 CPU, revision 6, tested at its nominal 50 MHz.
  • MC68060RC50 revisions 1 and 5: also with MMU and FPU, but they run quite a bit hotter and are not suitable for overclocking. Active cooling is recommended for them.
  • MC68LC060RC50 revision 4, mask 75G59Y: MMU, no FPU. It suits every 68060-based accelerator board and is available on its own as the MC68LC060RC50 CPU; every one is tested.

Installing the 68060 Library Files

Every 68060 on the Amiga needs the 68060 library files in the LIBS: folder. The 68060 leaves out some instructions of the older 68k CPUs, and the library handles them in software, so programs written for a 68020 or 68030 keep working.

  • AmigaOS 3.1.4 or 3.2.x: the library files come with the AmigaOS disks. Start the installer disk and select “CPU Libraries”.
  • AmigaOS 3.0 or 3.1: these versions bring no 68060 library of their own. I recommend the Mu680x0Libs package on aminet.net.

The TF1260 also comes with a floppy disk containing the 68060 library files. For a smooth first start:

  1. Install the library files while your A1200 still runs on its old CPU.
  2. Switch off and unplug the Amiga, then fit the TF1260 in the trapdoor slot.
  3. Start the Amiga, open a Shell and type version 68060.library. It should report the installed library.
  4. From now on, install software in its 060 version (on an MC68LC060, as described above).

Cooling and Overclocking

The TF1260 is supplied without a heat sink or fan, so plan the cooling yourself. At its nominal 50 MHz a revision 6 MC68060 is the easy case. The older revisions 1 and 5 run noticeably hotter, and for those active cooling with a fan is recommended.

The revision 6 MC68060RC50 has been tested to be overclockable up to 100 MHz with the BFG9060 and other accelerator boards. A stable system is not guaranteed, though, and the TF1260’s warranty does not cover overclocked CPUs. My advice is to enjoy the 68060 at 50 MHz: in an A1200 that is already a very large step up from the stock 14 MHz 68EC020.

Stock A1200 and TF1260 Side by Side

Stock A1200 TF1260 with MC68LC060RC50 TF1260 with MC68060RC50
CPU 68EC020, 14 MHz 68060, 50 MHz 68060, 50 MHz
FPU No No Yes
MMU No Yes Yes
Fast RAM None 128 MB 128 MB
Software that requires an FPU Does not run Does not run Runs
68060 library files Not needed Needed Needed

One thing to know: some older games and demos were written with the timing of a slower CPU in mind and can behave differently on a much faster one. Many WHDLoad installs correct exactly such problems.

Already Own a Blizzard 1260?

If you have a vintage Phase 5 Blizzard 1260 with the SCSI Kit IV, you can keep it going: the Blizzard SCSI Kit ROM Update 8.5 brings the kit’s ROM to the last release, and a BlueSCSI v2 replaces an old mechanical SCSI hard drive.

Storage to Go With It

A fast CPU deserves fast, silent storage, and your WHDLoad collection needs a home. The simplest choice in an A1200 is the Compact-Flash adapter for IDE 2.5″ 44-pin. It connects a Compact-Flash card to the internal IDE port and needs no power cable and no software drivers. In HDToolBox, set Mask to 0x7FFFFFFE and MaxTransfer to 0x1FE00, and check the maximum partition size for your AmigaOS version.

The Big-Box Route: A3000 and A4000

The TF1260 is for the Amiga 1200 only. For the Amiga 3000(T) and 4000(T) there is the BFG9060, also with 128 MB of Fast RAM and the same choice between the MC68060RC50 revision 6 and the MC68LC060RC50 revision 4. My guide Upgrading the Amiga 3000(T)/4000(T) with a 68060 CPU covers it in detail.

My Recommendations

  • A1200 for Workbench, WHDLoad games, image and sound work, MP3: the TF1260 with the MC68LC060RC50.
  • A1200 for 3D rendering, Quake or any software that requires an FPU: the TF1260 with the MC68060RC50, so every program runs and installing is never a question.
  • Storage for either: the Compact-Flash adapter, with a card large enough for your games and programs.
  • Amiga 3000(T) or 4000(T): the BFG9060 instead of an A1200 board.

Ready to give your A1200 its 68060? Order the TF1260 with the CPU that suits you. If you are unsure which one fits the programs you use, contact me and tell me what you run.

Posted on

Amiga Storage Options Compared: SD Card, CompactFlash, SCSI and IDE

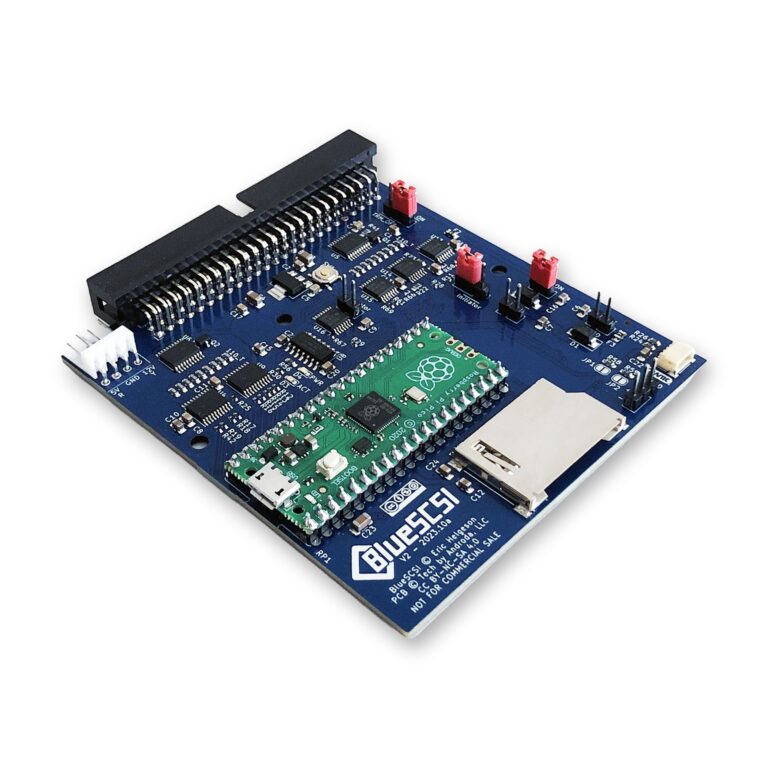
BlueSCSI v2 (Internal 50 Pins)

Switch on your Amiga and Workbench comes up from silent flash storage, with your whole game collection and a modern AmigaOS one double-click away. Modern storage makes that possible on every Amiga from the A500 to the A4000, and it retires the thirty-year-old hard drive and the worn floppy disks before they let you down.

This guide is for Amiga owners who want reliable, roomy storage: what SD cards, CompactFlash, SSDs and BlueSCSI make possible, what each needs, and which one fits your model.

What Modern Storage Changes

  • No more failing drives. CF cards, SD cards and SSDs have no motor and no heads. They are silent, and nothing has to spin up before the Amiga boots.
  • Your whole game library on one drive. WHDLoad installs floppy games to the hard drive. Each one starts from a Workbench icon, without disk swapping, and most can be quit back to Workbench with a key. A card of a few gigabytes holds a complete collection.
  • A modern Workbench. AmigaOS 3.2 is made for a hard drive. With gigabytes of space you install it alongside your programs, Aminet tools and your own projects, with room to spare.
  • Easy exchange with your PC. Download on the PC, copy to a FAT-formatted card, read it on the Amiga. With a BlueSCSI the whole Amiga hard drive is an image file on an SD card: you back it up by copying one file, and you can keep several setups side by side.
  • CD-ROM drives. An IDE port with ATAPI support takes a CD-ROM or DVD drive, so you can install software straight from CD.
  • Real speed for big-box Amigas. An SSD on the Multiface or a Zorro III DMA SCSI controller such as the ReA4091 lets a fast A3000 or A4000 load large programs and data without waiting for the drive.

The Options at a Glance

Option Connects to Bootable File transfer with a PC Best for
MicroSD adapter (SDBox) Parallel port No, drivers load from disk Very easy (FAT/FAT32) Transfers on any Amiga with a parallel port
PCMCIA CF adapter PCMCIA slot (A600, A1200) No, drivers load from the hard drive Very easy (FAT/FAT32) Amiga 600 and Amiga 1200
CF card, drive or SSD on IDE Internal IDE port or IDE card Yes Card has to come out; Amiga partitions The main boot drive
BlueSCSI v2 SCSI controller Yes, with an autoboot controller Easy: drive images are files on the SD card Amiga 3000 and Amiga 4000T, or Amigas with a Zorro II or Zorro III SCSI controller

MicroSD on the Parallel Port (SDBox)

The Amiga MicroSD Adapter (SDBox) is the simplest way to get files onto an Amiga. Revision 2.3 works on every Amiga with a parallel port; for the Amiga 1000 choose the A1000 version in the drop-down menu. There is also a barebone version without a housing.

It takes MicroSD cards of up to 32 GB formatted FAT16 or FAT32: copy files on your PC, plug the card in and read it on the Amiga as SD0:. Cards can be swapped without rebooting. It works with AmigaOS 1.3 and later and needs no hard drive: a boot disk mounts the card.

Before you order: it is powered by a USB charger and a Mini-USB cable (neither included), and the Amiga cannot boot from it. The parallel port is also slower than IDE or SCSI, so the SDBox is your transfer and archive drive rather than the drive Workbench runs from.

CompactFlash in the PCMCIA Slot (A600 and A1200)

With the PCMCIA Compact Flash Adapter, a FAT-formatted CF card in the side slot of the Amiga 600 or Amiga 1200 becomes your bridge to the PC: fill it there, slide it into the Amiga. The cfd and fat95 packages from Aminet are installed on the hard drive, so the adapter works together with an internal drive. Paired with an internal CF card, it makes a very comfortable A1200.

Bootable Storage on IDE

IDE is the usual way to a fast, bootable drive. The Kickstart ROM of the A600, A1200 and A4000 already contains the driver, so no extra software is needed to boot.

A600 and A1200: CompactFlash on the Internal 44-Pin Port

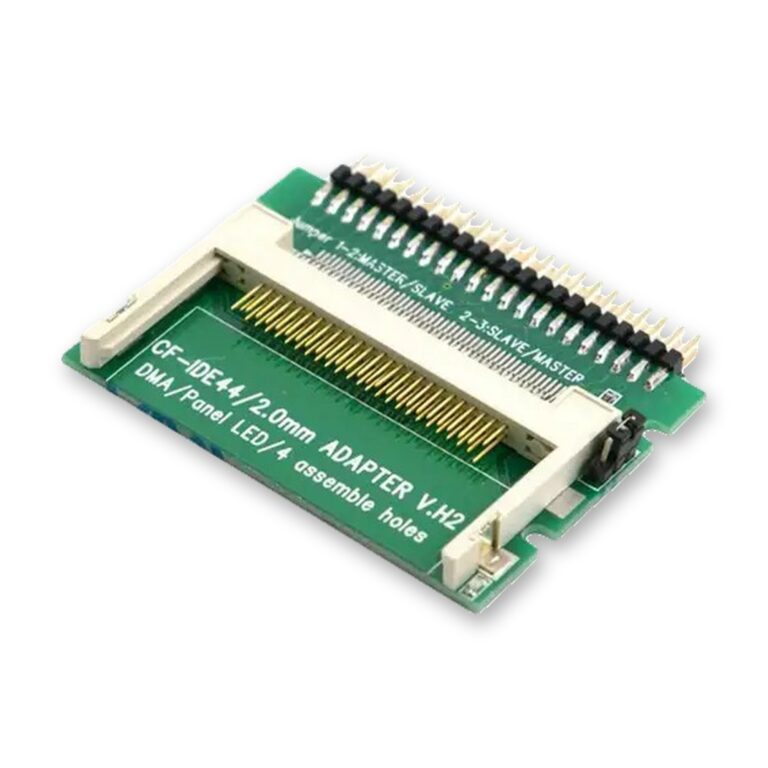
Compact-Flash adapter for the 44-pin IDE port of the Amiga 600 and 1200
The 44-pin CF adapter for the A600 and A1200

The Compact-Flash Adapter for IDE 2.5″ 44-Pin puts a silent CF card where the 2.5″ laptop drive used to be. It needs no power cable and no drivers; a jumper sets master or slave. In HDToolBox use Mask 0x7FFFFFFE and MaxTransfer 0x1FE00, and check the maximum partition size for your AmigaOS version.

The card carries Amiga partitions, which a PC cannot read on its own. For everyday transfers, add the PCMCIA adapter or an SDBox. Many owners also prepare the card in the WinUAE emulator on a Windows PC.

A4000: the Internal 40-Pin Port

The Amiga 4000 has a 40-pin IDE port with a primary and a secondary channel. The Amiga 4000 IDE Expansion (desktop A4000 only) lets you connect up to four devices, for example a CF card, a hard drive and a CD-ROM drive. If four devices cause trouble, IDEfix97 (AmigaOS 1.3 to 3.1) or AtapiMagic (3.1.4 to 3.2) helps; these packages are also the usual way to run an IDE CD-ROM drive. The 44-pin CF adapter above does not fit this port.

IDE on an Expansion Card

Multiface Zorro card with a 2.5-inch drive and a CF card fitted
The Multiface with a drive and a CF card fitted
  • The TK68030v2 accelerator for the A500 and A2000 has an IDE controller with an autoboot ROM (lide.device) for hard drives and CF cards, plus 64 MB or 128 MB of Fast RAM, which WHDLoad games are glad of. More in my guide TK68030v2: Speed, Fast RAM and IDE for the Amiga 500 and 2000.
  • The Multiface Mini for the A2000, A3000, A4000 or an A500 with a Zorro interface adds IDE with an autoboot ROM (Kickstart 1.3 to 3.2), Ethernet and a clock port.
  • The Multiface for the A2000, A3000(T) and A4000(T) brings SSD storage to a big-box Amiga. It has a socket for a SATA SSD and one for an M.2 SSD (use one or the other, never both), two IDE channels for up to four IDE/ATAPI devices including CD-ROM and DVD drives, and a CF slot you can reach from outside the case (switch the Amiga off before swapping the card). The M.2 drive must be a SATA (AHCI) M.2 2280 SSD with B and M key; NVMe drives are not supported. The IDE runs in Zorro II mode on every Amiga and transfers 1.6-2.6 MB/s in normal use. Ethernet and a clock port are on board; more in Multiface: SSD, Ethernet and a Clock Port in One Zorro Slot.

SCSI Emulation with BlueSCSI v2

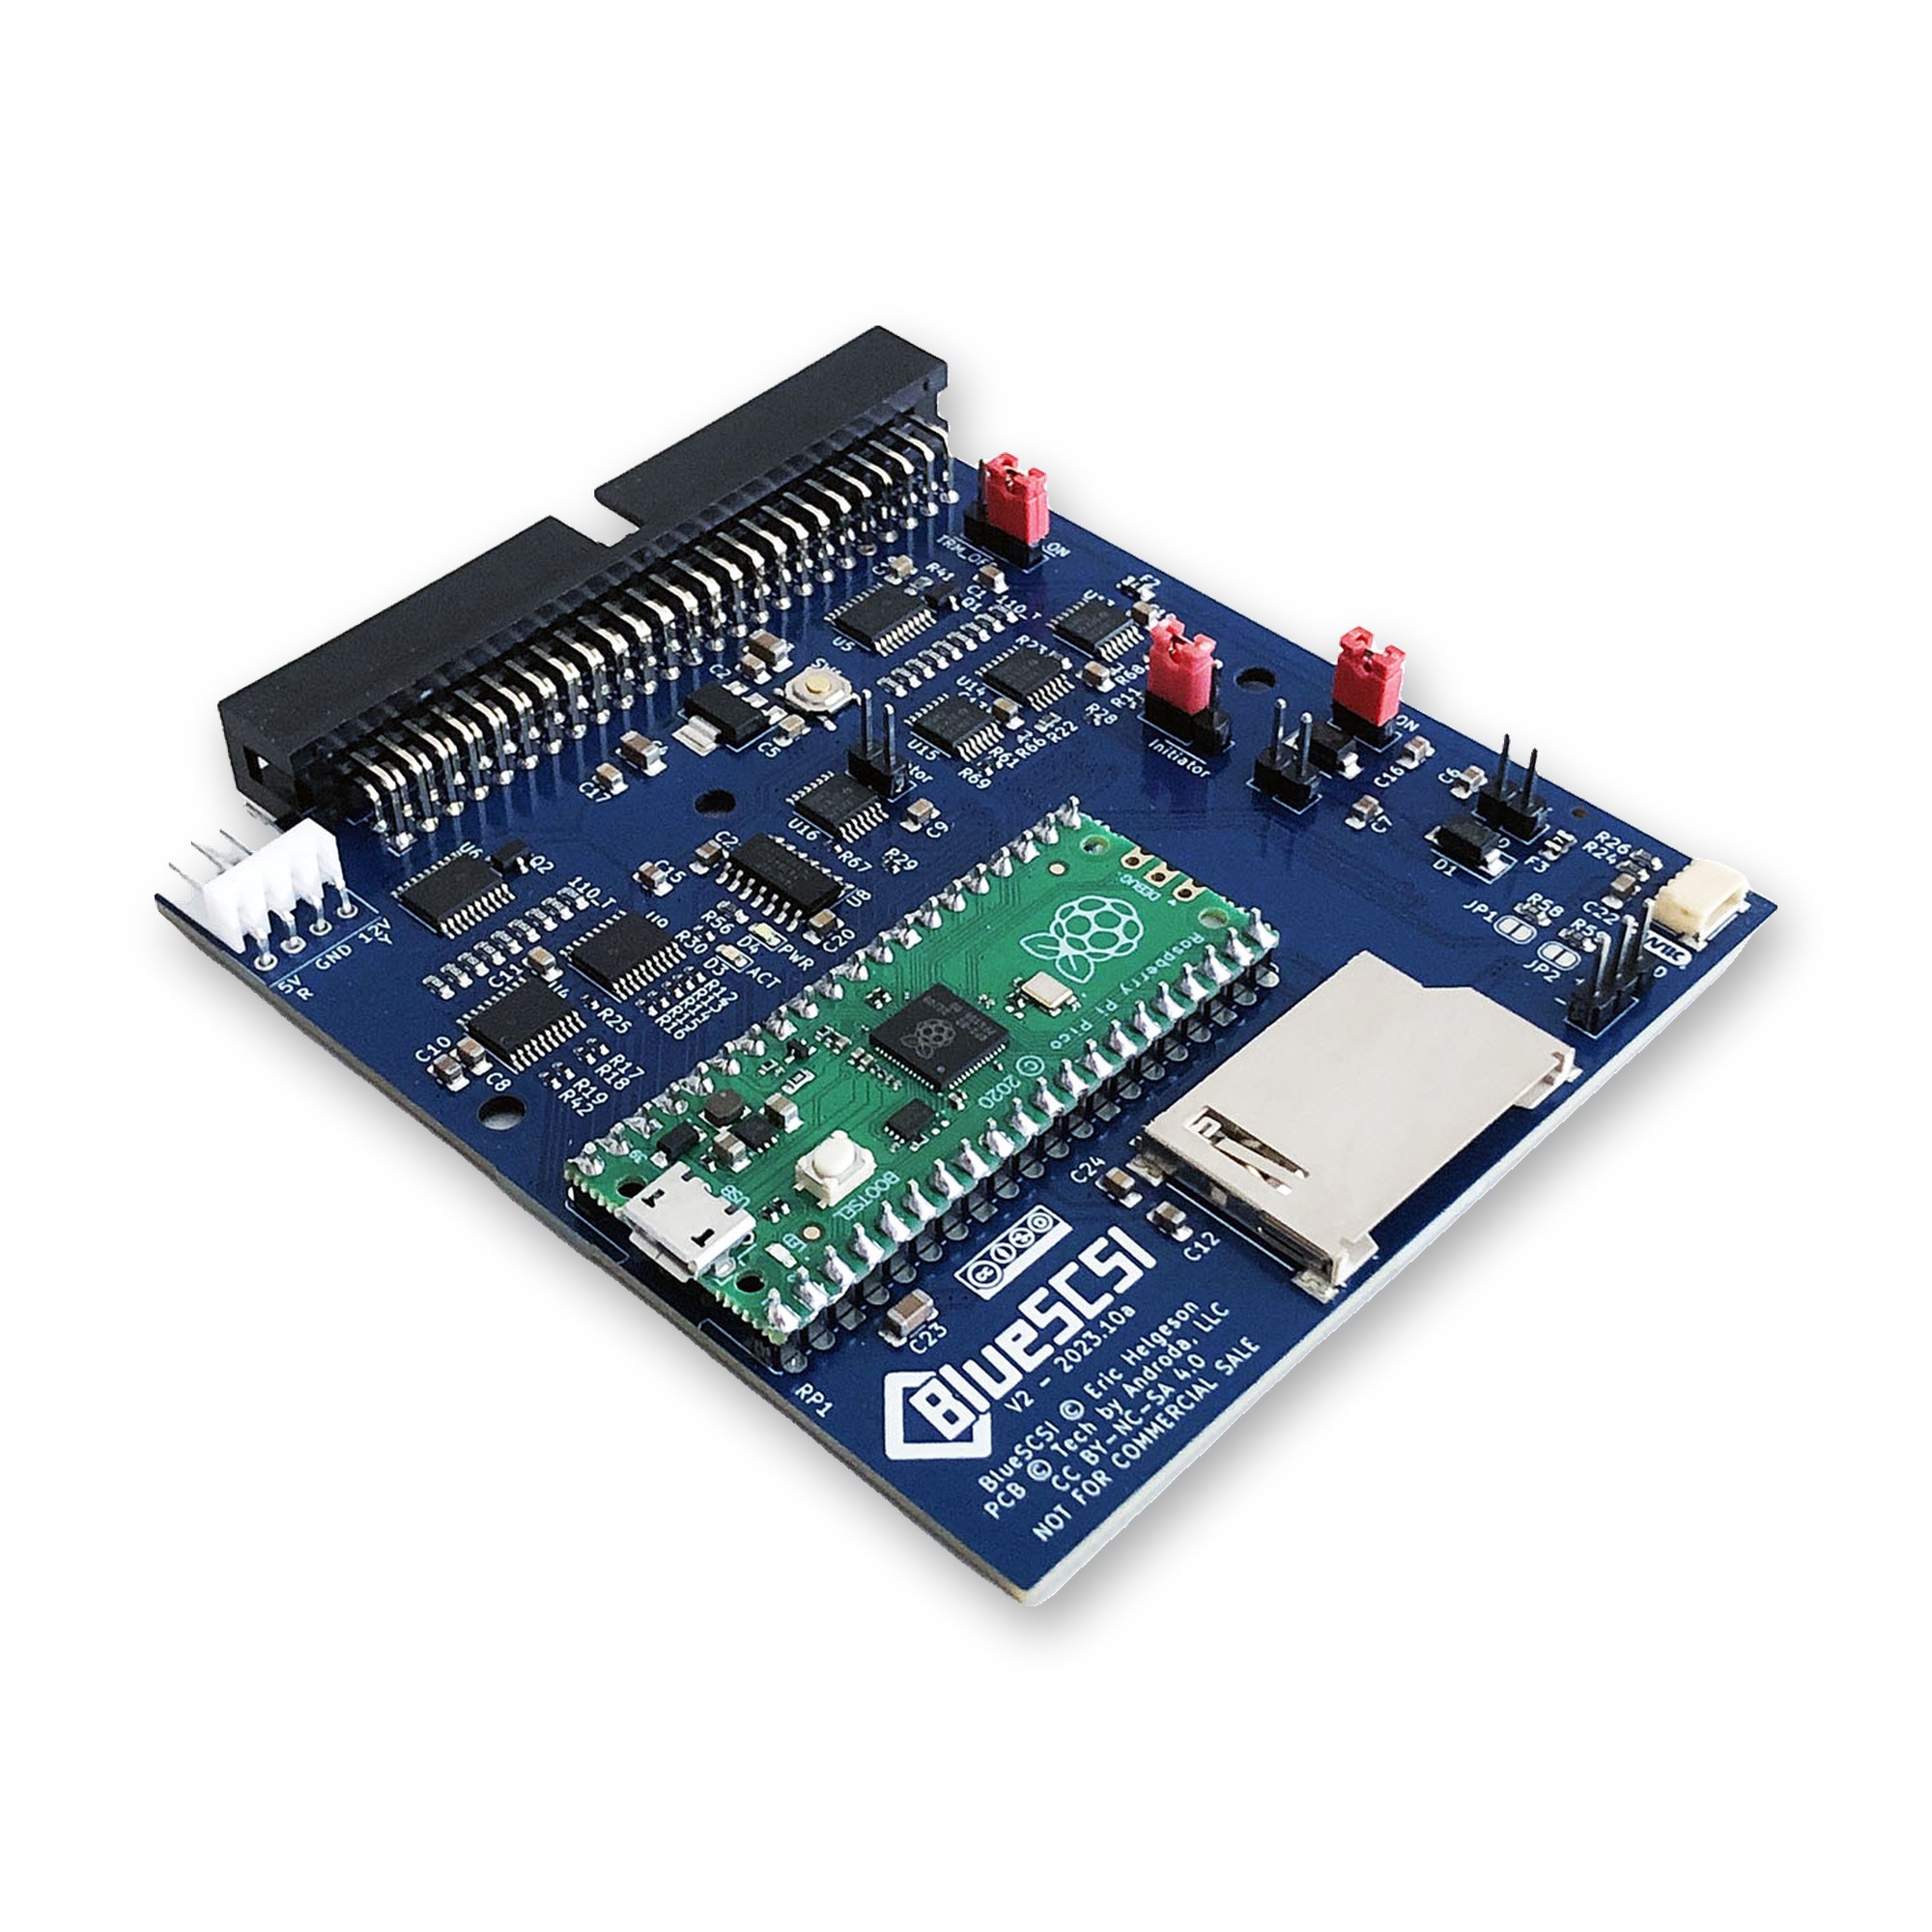
BlueSCSI v2 SCSI drive emulator with internal 50-pin connector
BlueSCSI v2: a whole SCSI drive on one SD card

BlueSCSI v2 is an open-source device that replaces a mechanical SCSI drive with an SD card. The drive images are ordinary files on the card, so you prepare and back them up on your PC. It supports Fast SCSI at up to 10 MB/s in synchronous mode, and termination is set with a jumper. There is the BlueSCSI v2 (Internal 50 Pins) and the BlueSCSI v2 (External 25 Pin) for DB25 ports.

Format new SD cards with the SD Card Formatter tool first. Problems have been reported with some SanDisk types; I use Transcend 16 GB/32 GB UHS-I U1 TLC cards. Setup details are in the BlueSCSI documentation.

Which Amigas Have SCSI

  • A3000(T): SCSI on board, internal 50-pin and external DB25. Either version fits.
  • A4000T: SCSI on board next to IDE; the internal version fits.
  • A2000: a Zorro II SCSI card such as the A2091 or a GVP Series II.
  • A500: a side-mounted SCSI expansion such as the A590.
  • A1200: a Blizzard SCSI Kit IV or an Apollo 1230/1240/1260 SCSI kit. The Blizzard/Apollo SCSI Kit Adapter Cable gives the kit a DB25 socket in the case; for the Blizzard kit there is the ROM Update 8.5.
  • A3000 and A4000: the ReA4091 Zorro III Fast SCSI-II controller.

If your Amiga crashes or freezes with an external SCSI device attached, the old controller chip is often the cause. The AM33C93A-16PC is an enhanced replacement for the A3000(T), A590, A2090, A2091, GVP Impact boards and others; on some devices the old chip is soldered in.

Speed: the Controller Sets the Pace

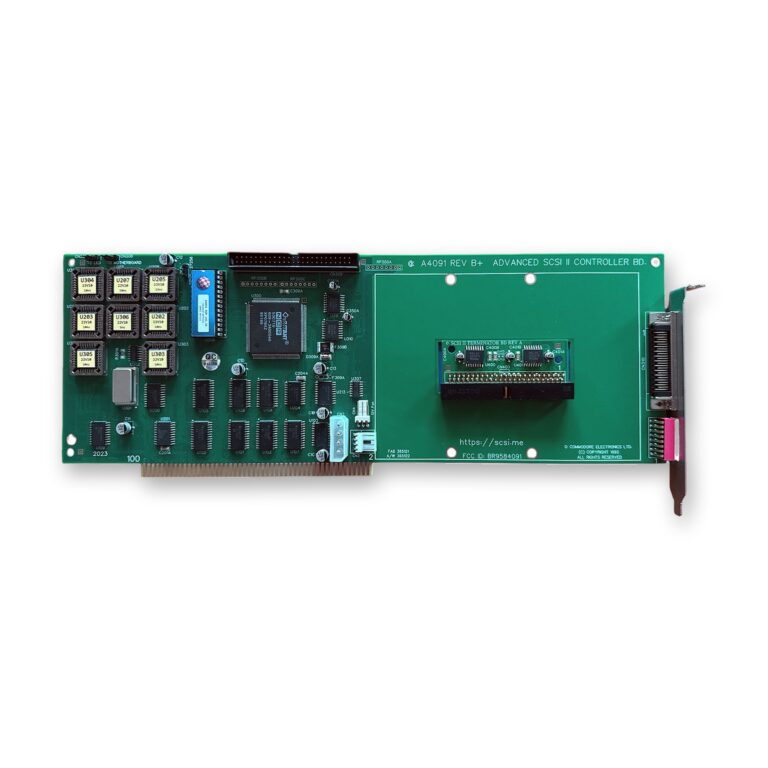
ReA4091 Zorro III SCSI controller card
The ReA4091 Zorro III DMA SCSI controller

Zorro II SCSI controllers such as the A590, A2091 or GVP Series II have a theoretical maximum of 3.58 MB/s, so the controller, not the BlueSCSI, sets the limit.

The ReA4091 is the fast lane for an A3000 or A4000: a Zorro III DMA controller that reaches 6-8 MB/s in practice, depending on the CPU, around three to four times what Zorro II IDE cards manage. It comes with an active terminator, and its modern autoboot ROM handles hard disks larger than 4 GB (TD64 and NSD64) and can boot from CD-ROM. Your A3000(T) or A4000(T) needs a Super Buster 11 chip for it to work properly. A Phase 5 Fastlane Z3 needs ROM version 8 or later with a 68060; the Fastlane Z3 ROM Update 8.5 is the last release.

On an A3000 with a 68040 or 68060 board, SCSI hang-ups come from the DMAC chip. Neither a ReA4091 nor a BlueSCSI cures them; the DMAC has to be upgraded, which the ReSDMAC project is working on. My guide Upgrading the Amiga 3000(T)/4000(T) with a 68060 CPU covers this in more detail.

CDTV and CD32

The CDTV has a parallel port, so the SDBox works there too. Its drivers load from a boot disk, and the CDTV has no built-in floppy drive, so you need an external one. If a SCSI interface is fitted, a BlueSCSI can serve as its drive, and the AM33C93A fits that interface.

The CD32 has no parallel port, no IDE port and no PCMCIA slot. Storage comes through boards for its expansion port, some of which add IDE; I do not currently stock one.

My Recommendations per Model

Not sure which card suits your plans? Contact me with your model and a list of your expansions, and I will tell you which storage fits.

Posted on

Getting Your Amiga Online: Plipbox and Multiface

Amiga Ethernet Adapter (Plipbox)

Imagine a drive icon on your Workbench that opens a folder on your PC or NAS. You fetch a program from Aminet, unpack it and start it, and not a single floppy disk changes hands. In the evening you read your email in YAM or chat on IRC, and the clock is right every time you switch on. A network connection makes all of this possible, and the hardware is simpler to install than many people expect.

This guide is for owners of 68k Amigas, from the Amiga 500 to the A4000T. It shows what a network brings, which hardware fits your model and which software you need. At the end I name my pick for each model.

What a Network Connection Opens Up

  • Files without disks. With an SMB client, a shared folder on your PC or NAS appears on the Amiga like another drive. With FTP you move files to and from any Windows, macOS or Linux machine. WHDLoad games, music modules, pictures and your own projects go across the network, and you can back up the Amiga’s hard drive to the NAS the same way.
  • Aminet on the Amiga itself. Aminet, the large archive of Amiga software, is open to your Amiga directly. Download an archive straight to the hard drive, unpack it with LhA and install it, without a detour through the PC.
  • Email. SimpleMail and YAM are full email programs for AmigaOS. Together with AmiSSL they handle the encrypted connections that most mail providers ask for today.
  • IRC and chat. IRC is still very much alive, and Amiga owners meet in their own channels. AmIRC is the classic Amiga client.
  • The right time. A small time-sync tool sets the Amiga’s clock from a time server at every boot. On models without a battery-backed clock, such as a stock A500 or A1200, your files finally get correct dates.
  • Remote access. With Telnet or SSH you log in to a Linux machine, a Raspberry Pi or your NAS from an Amiga Shell window, or call one of the Telnet BBSes that are still running.
  • The web, retro style. IBrowse 2.4 with AmiSSL, Voyager and AWeb show simple, text-based websites and pages made for vintage computers. Reading them on the Amiga’s own screen has its own charm.

Two Ways to Connect

  • Ethernet through the parallel port (Plipbox): plugs in from outside and works on almost every model.
  • A Zorro network card (Multiface, Multiface Mini): for big-box Amigas, faster, and combined with storage and a clock port.

The Plipbox: Ethernet for Almost Every Amiga

Plipbox Deluxe Ethernet adapter for the Amiga parallel port
The Plipbox Deluxe: Ethernet through the parallel port, no need to open the Amiga.

The Plipbox plugs into the Amiga’s parallel port and takes a normal Ethernet cable on the other side. You do not need to open your Amiga. It works with the Amiga 500, 600, 1000, 1200, 2000, 2500, 3000(T) and 4000(T) and the CDTV, which makes it the natural choice for every model without Zorro slots.

It comes in two versions with the same electronics: the Plipbox Deluxe and the Plipbox Barebone, the board without a housing. Both have three LEDs (power, network link, network activity) and a PhotoMOS relay that switches the adapter on and off together with your Amiga.

What you need:

  • Kickstart 2.0 or higher and at least 2 MB of RAM. For a web browser, a hard drive and a 68020 or better CPU are recommended.
  • A USB charger. The parallel port supplies only about 10 mA, so the Plipbox takes its power from a regulated 5 V USB charger, for example an old phone charger, connected to its USB-C port.
  • The driver. The device driver and a setup manual for the TCP/IP stack come from lallafa, who designed the original Plipbox.

While the Plipbox is plugged in, it uses the parallel port, so a printer or another parallel device has to wait.

Amiga 1000

The Amiga 1000’s parallel port has a female connector and a different pinout. Every Plipbox is therefore also available as an A1000 edition with the correct connector and pinout; you select it in the drop-down menu on the product page. With that edition you do not need the separate Parallel Port Adapter, which is meant for other parallel devices built for the later models. Keep the Kickstart 2.0 requirement in mind: a stock A1000 loads Kickstart 1.x from its Kickstart disk.

Multiface and Multiface Mini: Zorro Cards for Big-Box Amigas

Multiface Zorro card with its Ethernet port and Compact-Flash slot on the slot bracket
The Multiface: Ethernet port and Compact-Flash slot on the bracket

In a big-box Amiga, a Zorro card is the faster and tidier solution. It keeps the parallel port free, and both cards I carry combine network, IDE and a clock port in one slot.

The Multiface is for the Amiga 2000, 3000(T) and 4000(T). Next to Ethernet it has a 2-channel IDE interface for up to four IDE/ATAPI devices, a Compact-Flash slot, a SATA or M.2 SSD connector and an A1200-compatible clock port. In the A3000(T) and A4000(T) the Ethernet interface switches to Zorro III mode. An Amiga 2000 with a 68020 can expect up to 100 kB/s, an Amiga 4000 with a 68060 easily reaches over 600 kB/s.

Setting up the network is straightforward. The driver, enc624j6net.device, is on the floppy disk that comes with the card; copy it to SYS:Devs/Networks and point your TCP/IP stack to it. For a 68000 CPU there is a special version, enc624j6net.device_68000, which you rename to enc624j6net.device; on these machines Roadshow is the recommended stack. My Multiface guide walks you through the whole card, from the SSD to the network.

The Multiface Mini is the smaller board for the A2000, A3000, A4000, or an A500 with a Zorro interface. It has Fast Ethernet with a SANA-II compatible driver, a BSC AT-Bus compatible IDE controller with auto-boot ROM (Kickstart 1.3 to 3.2) and a clock port, for example for the RapidRoad. It detects Zorro II or Zorro III by itself.

Choose the Multiface if you also want to run an SSD from the same card; choose the Mini for network, IDE and a clock port in a simpler package, or for an A500 with a Zorro interface.

A Faster CPU Means a Faster Network

Processing network data in the TCP/IP stack is CPU-intensive, so the Amiga’s processor sets the pace, not your broadband line. The Plipbox reaches up to 96 kB/s in theory and gets faster with a faster CPU; detailed figures are in the Plipbox benchmarks on GitHub. On the Multiface the range runs from about 100 kB/s on an A2000 with a 68020 to over 600 kB/s on an A4000 with a 68060. When you measure, make sure the server you download from provides enough bandwidth.

Chart of Multiface Ethernet transfer speeds on the A2000 with 68020 and 68030 and the A4000 with 68030, 68040 and 68060
Multiface Ethernet speed by Amiga model and CPU

An accelerator therefore pays off twice: the network gets faster, and so does everything else. My guides cover the TK68030 v2 for the A500 and A2000, the 68060 upgrade for the Amiga 1200 and the 68060 upgrade for the A3000 and A4000.

The Software: a TCP/IP Stack

The network hardware talks to the system through a driver, usually a SANA-II device driver. On top of it runs a TCP/IP stack, the part that actually speaks the Internet’s language. The common choices are:

  • Roadshow: a newer commercial stack, still maintained, and the one most people choose today.
  • AmiTCP: the classic stack of the 1990s, still found on many installations.
  • MiamiDX: the successor to Miami, with a graphical setup that was popular in the dial-up days.
  • Genesis: a stack based on AmiTCP with a graphical setup, best known as the stack that came with AmigaOS 3.9.

Then add the programs for what you want to do: an SMB or FTP client, SimpleMail or YAM, an IRC client, a time-sync tool, Telnet or SSH, and a browser. AmiSSL provides the encryption that many of these programs use for secure connections.

The Web on a 68k Amiga

Most large websites today are built for powerful computers, with a lot of JavaScript and encryption that a 68k CPU has to calculate itself. Many of them load slowly or do not display properly. Simple, text-based sites and pages made for vintage computers work well, and so do encrypted sites with light pages once IBrowse has AmiSSL behind it. Think of the Amiga as a machine for files, mail, chat and the friendly corners of the web, and it will not disappoint you.

At a Glance

Option Models Open the Amiga? Speed Also gives you
Plipbox Deluxe / Barebone A500, A600, A1000 (A1000 edition), A1200, A2000, A2500, A3000(T), A4000(T), CDTV No Up to 96 kB/s in theory, depends on the CPU –
Multiface A2000, A3000(T), A4000(T) Yes (Zorro slot) Up to 100 kB/s (A2000, 68020) to over 600 kB/s (A4000, 68060) 2-channel IDE, Compact-Flash, SATA or M.2, clock port
Multiface Mini A2000, A3000, A4000, A500 with Zorro interface Yes (Zorro slot) Fast Ethernet, depends on the CPU Auto-boot IDE, clock port

My Picks per Model

  • Amiga 500, 600 and 1200, CDTV: the Plipbox Deluxe, or the Plipbox Barebone if you do not need the housing. An A500 with a Zorro interface can also take the Multiface Mini.
  • Amiga 1000: the A1000 edition of the Plipbox Deluxe, provided your A1000 runs Kickstart 2.0 or higher.
  • Amiga 2000: the Multiface, or the Multiface Mini for a simpler set-up; without a free Zorro slot, a Plipbox.
  • Amiga 3000(T) and 4000(T): the Multiface, whose Ethernet runs in Zorro III mode there.
  • Files only, no network: the SDBox, a MicroSD adapter for the parallel port with up to 32 GB on FAT-formatted cards, for Amiga OS 1.3 or higher.

Not sure which option suits your machine and its expansions? Contact me, tell me what you have, and I will help you get your Amiga online or simply swap files between your PC and your Amiga.